
Introducing React Native Audio API
 Michal Sek•Jan 28, 2025•7 min read
Some time ago, we released react-native-audio-api. But what is it all about?
What is react-native-audio-api?
react-native-audio-api aims to bring the same tools available in browsers via the Web Audio API to React Native, offering precise, high-performant audio control and playback.
By aligning with the Web Audio specification, we’re creating a single API that works seamlessly across native iOS, Android, browsers, and even standalone desktop applications. The React Native ecosystem currently lacks a high-performance API for creating audio, adding effects, or controlling basic parameters like volume for each audio separately — and we’re here to bridge that gap!
Our end goal
The Web Audio API can feel a bit counterintuitive at first, especially for developers new to digital sound processing. However, there are plenty of great libraries built on top of it, like tone.js and howler.js, which offer user-friendly abstractions over Web Audio. To find more examples check out the Awesome WebAudio list.
By creating react-native-audio-api that is compatible with Web Audio, we’ll be able to bring those libraries to react-native.
The Web Audio API in detail
So far, I’ve highlighted what Web Audio can do and mentioned keywords like high performance — but how does it actually work in practice? Let me quote the description from MDN web docs:
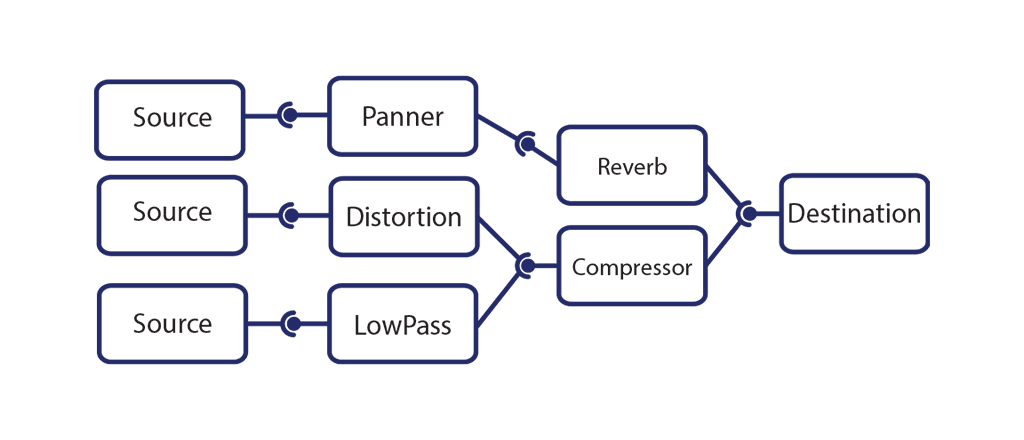
“The Web Audio API involves handling audio operations inside an audio context, and has been designed to allow modular routing. Basic audio operations are performed with audio nodes, which are linked together to form an audio routing graph. Several sources — with different types of channel layout — are supported even within a single context. This modular design provides the flexibility to create complex audio functions with dynamic effects.”

Simply put, in the Audio API, the signal (our audio data) flows in one direction — from the source (e.g., a file or signal generator), through optional processing elements, and finally to the destination (e.g., device speakers). These components are all called audio nodes.
Basic concepts behind the Audio API
As mentioned above, we can distinguish three types of audio nodes:
- Audio Sources — Source nodes are usually the starting point in the graph, and as the name suggests, they provide audio input into the graph. This input can be generated mathematically (OscillatorNode), loaded from recorded data (AudioBufferSourceNode), or obtained from a stream (MediaStreamAudioSourceNode).
- Processing Nodes — Processing nodes provide simple audio effects or modifiers. The most common examples include changing the volume of the source (GainNode) or cutting off specific frequencies (BiquadFilterNode).
- Output Nodes — The last type of nodes are output nodes, which, in most cases, connect directly to the device hardware, such as speakers or headphones.
The Audio API doesn’t impose any strict limits on how many source or processing nodes you can create and use simultaneously. It all depends on the device — some processors can handle over 1000 sounds at once without stuttering.
However, there is one limitation with audio source nodes that may not be immediately obvious but is important when using the Web or React Native Audio API. Source nodes are one-time use only — once you call stop on a source node (or it stops automatically), you’ll need to create a new one of the same type.
Now that I’ve covered the basics of what Web Audio is and how it works, let’s take a look at how it plays out in a simple use case.
Playback using the React Native Audio API
In this section, I’ll walk through a basic example of using the API. I’ll load an audio file into the application and play it as soon as it’s successfully downloaded. Let’s start with the full code:
As you can see, all the important code is in handlePlay callback. Let’s break it down line by line:
- To work with audio, we have to create an AudioContext object. It’s our main interface for interacting with both the web and native audio API. The audio context controls the lifetime of audio nodes and is also responsible for communicating with the device’s hardware interfaces.
- In the next line, we’re using expo-file-system to download the audio file to the device’s local file system. This stems from a limitation of the current version of the React Native Audio API — audio files must be available on the device’s local system. In future versions, we plan to support using fetch or similar APIs to handle files entirely in memory, which is something that would be necessary in the standard browser Web Audio API.
- The local file system path to the audio asset is then passed to the decodeAudioDataSource method of the audio context. This function loads the file into memory, decodes it if necessary and returns an instance of an AudioBuffer object. The AudioBuffer contains the raw audio data, converted to the device-specific parameters (like sample rate), and is ready to be played.
- In the next line, we create our first source node. The AudioBufferSourceNode, as the name suggests, is a type of source node used to play audio from the audio buffers obtained in the previous step.
- In the final lines, we connect the playerNode to another property of the audio context called destination. This is an output node that’s directly connected to the device’s hardware.
- Lastly, we instruct the playerNode to start playing at the current time.
As you can see, it’s a bit more complex than simply using an <audio> tag or expo-audio, but by having access to the raw audio data, we can manipulate the sound in any way we want. So, let’s take a look at a more complex example to explore the possibilities.
Cross-fading audio
Let’s imagine we’re building an audio player application and want it to smoothly transition from one song to another. We want the transition to take exactly one second, so we need to address two main points:
- Know the start time and duration of the first song to ensure we can precisely start the second song and know when to begin the transition.
- Apply a volume-change effect to each song. This will allow the first song to fade out before it ends, while the second song fades in.
The first point is easy to handle, as we saw in the previous example. The AudioContext has a currentTime property, which allows us to precisely start the songs or the transition. The AudioBuffer interface also has a duration property, which provides the remaining information to calculate the necessary timestamps. Now, let’s explore how we can address the second point.
The GainNode and AudioParams
To achieve the fade-in and fade-out effects, we’ll use processing nodes, specifically the GainNode, which I mentioned earlier in the article. The GainNode is one of the simplest nodes in the Audio API. It takes the audio data from its input and multiplies it by a scalar — the gain (or volume, if you prefer), which is an audio parameter.
The AudioParam is an interface that controls various aspects of audio nodes. In the case of the GainNode, the AudioParam is the gain (or volume). It allows us to control the value in several ways:
- by setting the value directly: gain.value = 1
- by specifying the value at a given time: setValueAtTime(value, time)
- by modifying the value over time, either using linear (linearRampToValueAtTime(value, endTime)) or exponential (exponentialRampToValueAtTime(value, endTime)) transition.
The solution
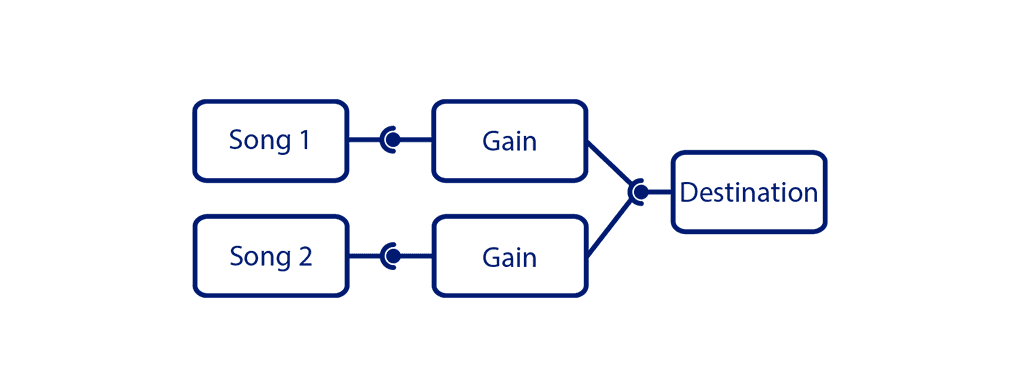
Let’s put everything together. We’ll load the files just like in the previous example, use the audioContext.currentTime property to calculate the start and stop times of the songs, and use the GainNode to create the fade-in and fade-out effects.
Each song has its own AudioBufferSourceNode and GainNode, with both GainNodes connected to the audio context’s destination node. We schedule the second song to start one second before the first one finishes, based on its start time and duration. To create the fade in/out effects, we use the linearRampToValueAtTime method of the GainNode’s param.
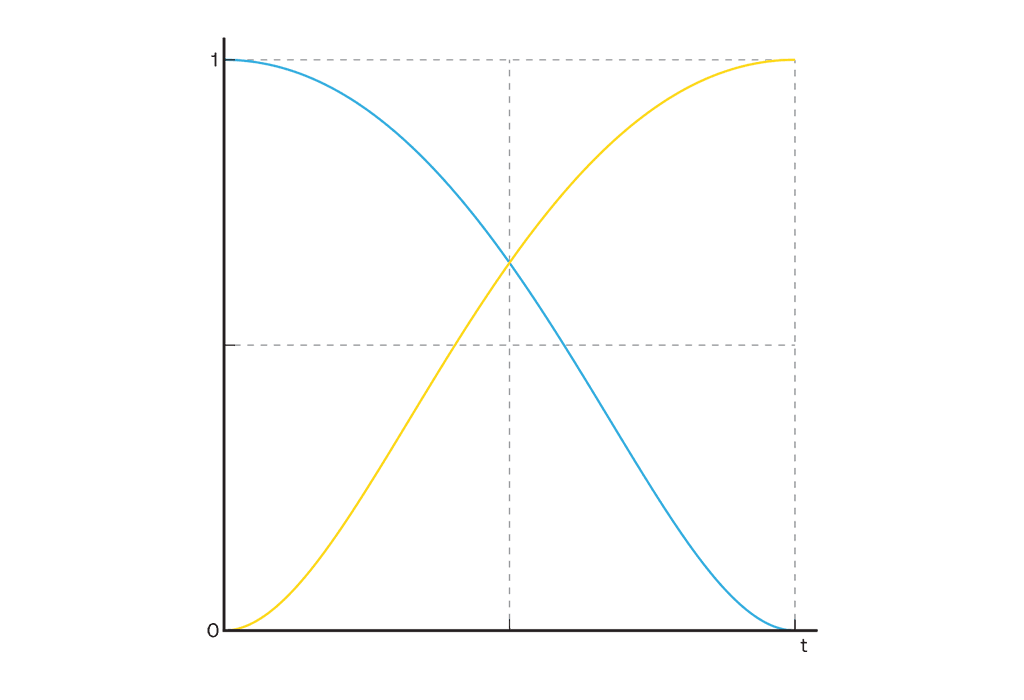
A note about equal power cross-fade
Using linear interpolation is a simple approach, but it can lead to a noticeable volume drop when transitioning between songs.

In a real-world scenario, we’d want to use an “equal power cross-fade,” which minimizes this effect, but that’s a topic for another article.
Takeaways
The React Native Audio API unlocks a whole new range of possibilities for working with audio in mobile and web apps. This article only scratches the surface of what’s possible. To learn more, check out our repository and documentation, or dive into the full MDN docs on the Web Audio API.
If you would like to see more examples using Web Audio API check out:
- Web Audio API samples
- Learning Synths series by Ableton
Stay tuned for upcoming React Native Audio API updates from us!