
EraserAI — How to create efficient app for edge device?
 Mateusz Sluszniak•Sep 16, 2024•10 min read
EraserAI — How to Create an Efficient Image Manipulation App for Edge Devices?
Imagine you’re trying to take a great photo in front of the famous Milan Cathedral, but there are too many people in the shot. You might find yourself waiting for the crowd to clear or searching for a better spot to capture your perfect selfie. Frustrating, isn’t it? If only there were a tool to solve this problem.
Wait, isn’t it a good task for computer vision?
Well, there is — and it’s a perfect job for computer vision! This technique, called inpainting, can help remove unwanted objects from a photo. In our example, inpainting would let us erase the people in the background and seamlessly fill in the empty space, making it look like they were never there.
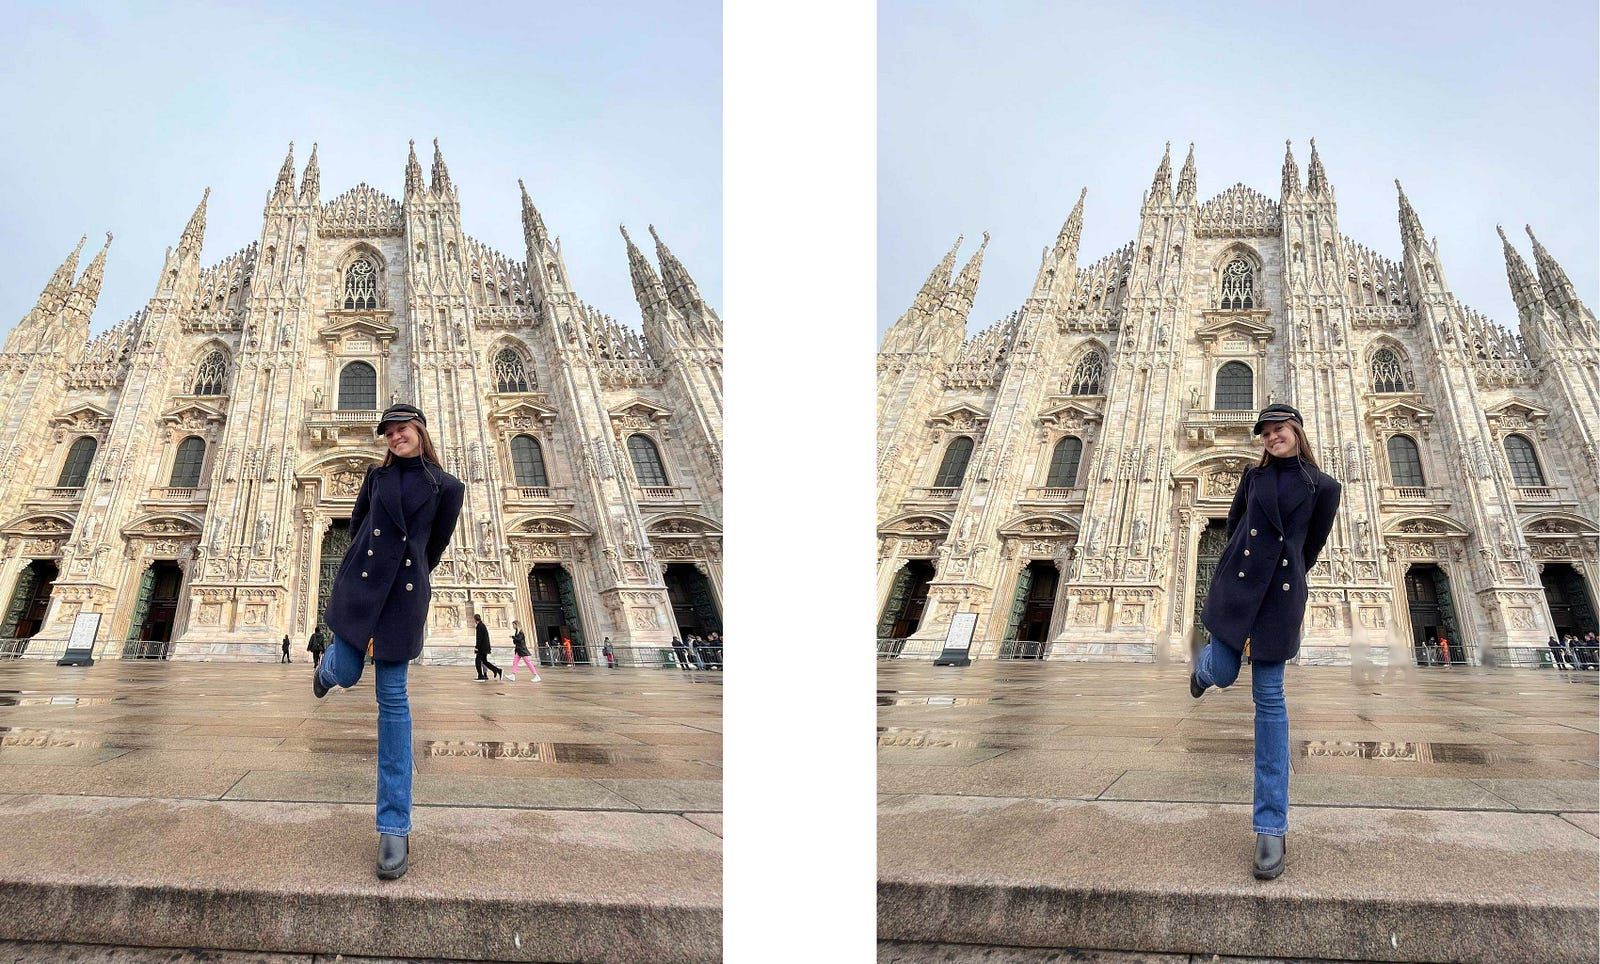
We tackled inpainting tasks for videos in the past; if you haven’t seen it, use this link. However, image inpainting is tougher than video inpainting. Why? For a video, we have reference frames that give you a context of how intermediate frames should be inpainted. Hmm, so maybe we can do something similar? Let’s take a picture and use a reference image to guide the inpainting process by blending elements from the reference into the original. Since we already have some experience with reference inpainting, we decided to create a mobile app.
Video 1: Demo of Reference Inpainting for video
Before moving on to the next section, for better understanding, we introduce a term that is used frequently in the rest of the article: “mask.” A mask is an area that we want to change. In the case of the photo above, we want to alter sections of the image containing the crowd, so we refer to these areas as the mask.
Motivations and Goals
After the introduction, our motivation seems straightforward. We wanted to create an app with reference inpainting that will have an advantage over other inpainting apps thanks to the reference. It will mainly target images created in unfavorable, dynamic environments like crowded places.
Of course, we wanted to stand out from other similar solutions. At first, it seemed difficult, especially since there are a lot of inpainting apps available on the Apple Store, etc. We needed to think of some features that are not available in other apps. We researched currently available solutions on the Internet, and after that, we decided that our app should support:
- Computation on edge device
- Leverage the potential of GPU computation on mobile
- Add automated masking as an alternative to classic brush
- Use reference image as a hint for a model
Let's elaborate on them a little:
Computation on Edge Device:
We believe that the future of AI is tightly related to making it more accessible via edge devices. Reasons? Firstly, better privacy, as our data is not transferred anywhere. Secondly, when we run computation on the device, we don’t need to worry about scaling infrastructure. Next, no exposure to the network. This provides two benefits: first, we can use it in offline mode, implying full privacy; and second, there is no latency introduced by the transfer of data to a server. Additionally, it leads to lower energy consumption, which has a direct impact on the environment.

Leverage the Potential of GPU Computation on Mobile
Modern smartphones have decent support for accelerated computation. For example, every iPhone since version 8 includes a neural engine — a unit specifically suited for AI computation, more so than a classic GPU. That’s why we decided to leverage the potential accumulated in them. Support for computing on the GPU solves the problem of slow inference.
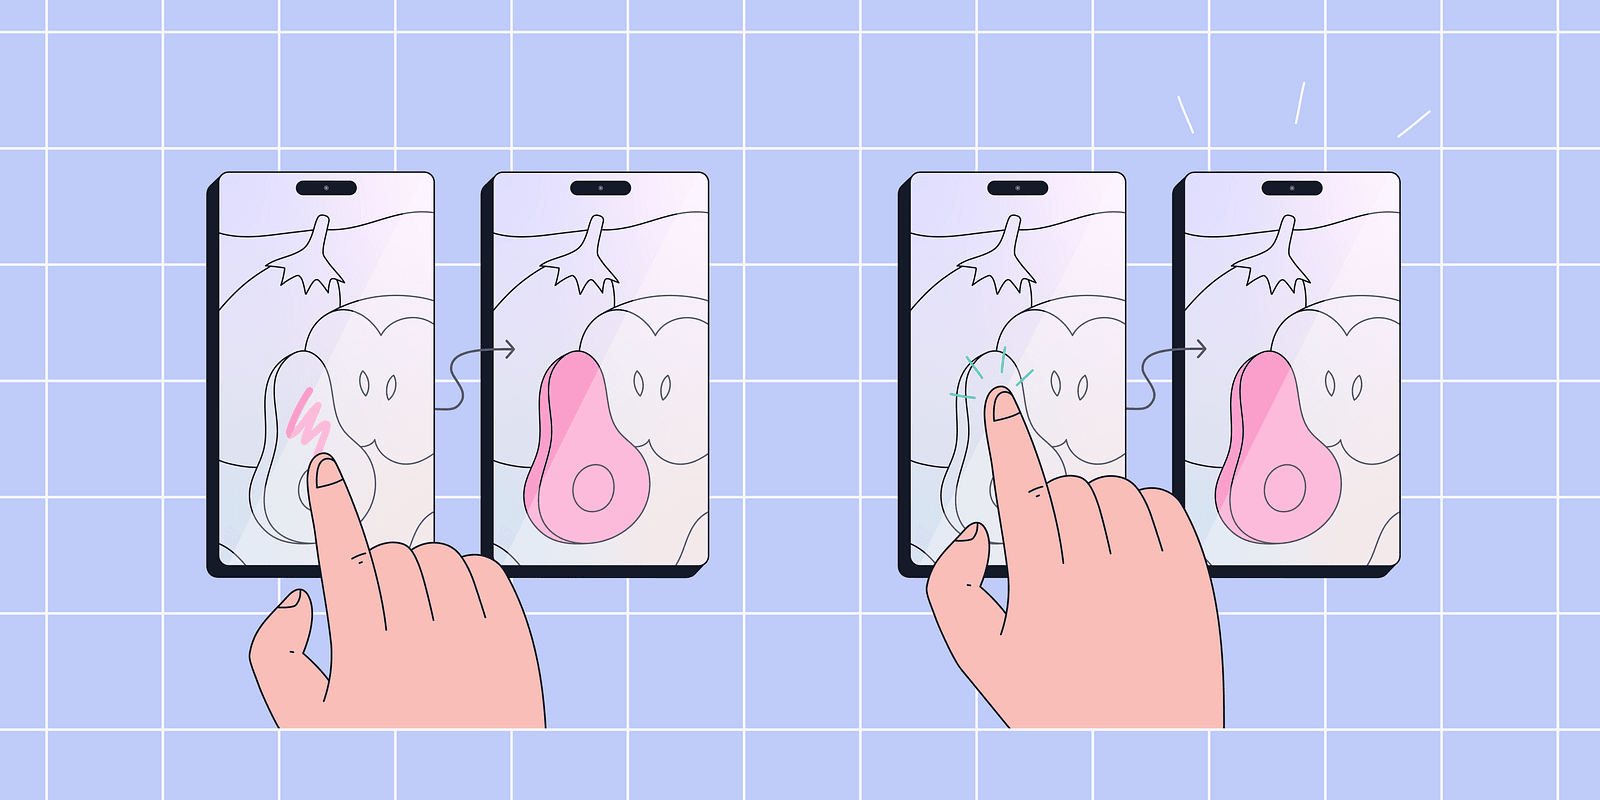
Add Automated Masking as an Alternative to Classic Brush
As we tested available apps for inpainting, we discovered that almost all provide the functionality of a masking brush. The process is presented in Figure 3 (Left). The area for masking is provided directly by the user. We thought that it would be cool to add an alternative that would create a mask based on a simple click prompt. In Figure 3 (Right), we present a minimalist view of this feature.
Use Reference Image as a Hint for a Model
Inspired by the results of video reference inpainting, as explained in detail in this blog, we decided to move forward with image reference. This feature provides the inpainting model with a significant advantage over non-reference models. Regular models only generate inpainted areas based on the non-masked sections of the image, whereas reference inpainting models can intelligently “copy and paste” some parts of the image.
Okay, now you understand why we decided to make this app and what you can expect from it. Now, we can move on to creating the app.
Peeking Under the Hood
Since both the front-end and native code of the app in the project are typical layers, we won’t elaborate on them. Instead, we focus on exporting ML models into a format that fits into edge devices and enables compute operations on the GPU. That will be a task for ExecuTorch, a new library from the PyTorch team.
Models Export
For this part we used ExecuTorch. ExecuTorch is a library that provides tools to export machine learning models into a format suitable for edge devices. It allows for the use of optimized backends such as CoreML and XNNPack. Besides that, it provides a codebase for handling exported models on the backend.
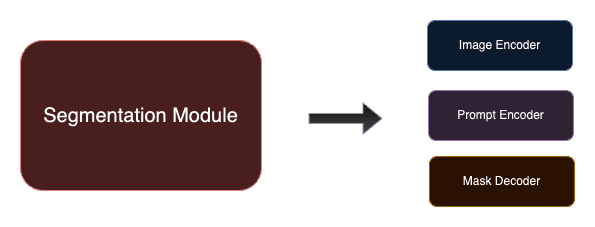
We needed to export two models: a masking model and an inpainting model. For the masking model, we opted for EfficientSAM, and for the inpainting model, we selected our proprietary model. Now, we’ll make a quick remark. Intelligent masking is, in fact, a segmentation task — selecting sections of the picture based on input. In our case, the input consists of a set of points that we clicked. This is why, in the rest of the article, we refer to masking as segmentation, because here they are synonyms.
For both convenience and, more critically, performance reasons, we decided to split the segmentation model into three distinct sub-models — image encoder, prompt encoder, and mask decoder. This approach allows us to lazy load the models only when they are needed in the app. For example, we load the image encoder as soon as an image for inpainting is provided, before addressing the prompt.
You may wonder how the split impacts the whole process of exporting. Well, it doesn’t. Usually, sub-models are distinct parts of the bigger model, and you have individual access to them. So, as long as they are implemented as torch.nn.Module, you can simply populate the whole model with weights and then export each sub-model separately. If you want to learn more about segmentation and inpainting models, please read the appendices at the end of this blog post.
Exporting model using ExecuTorch was presented in our previous blog posts (here, here, and here), so check them out as well as the ExecuTorch tutorials. Now, we just briefly explain the exporting process.
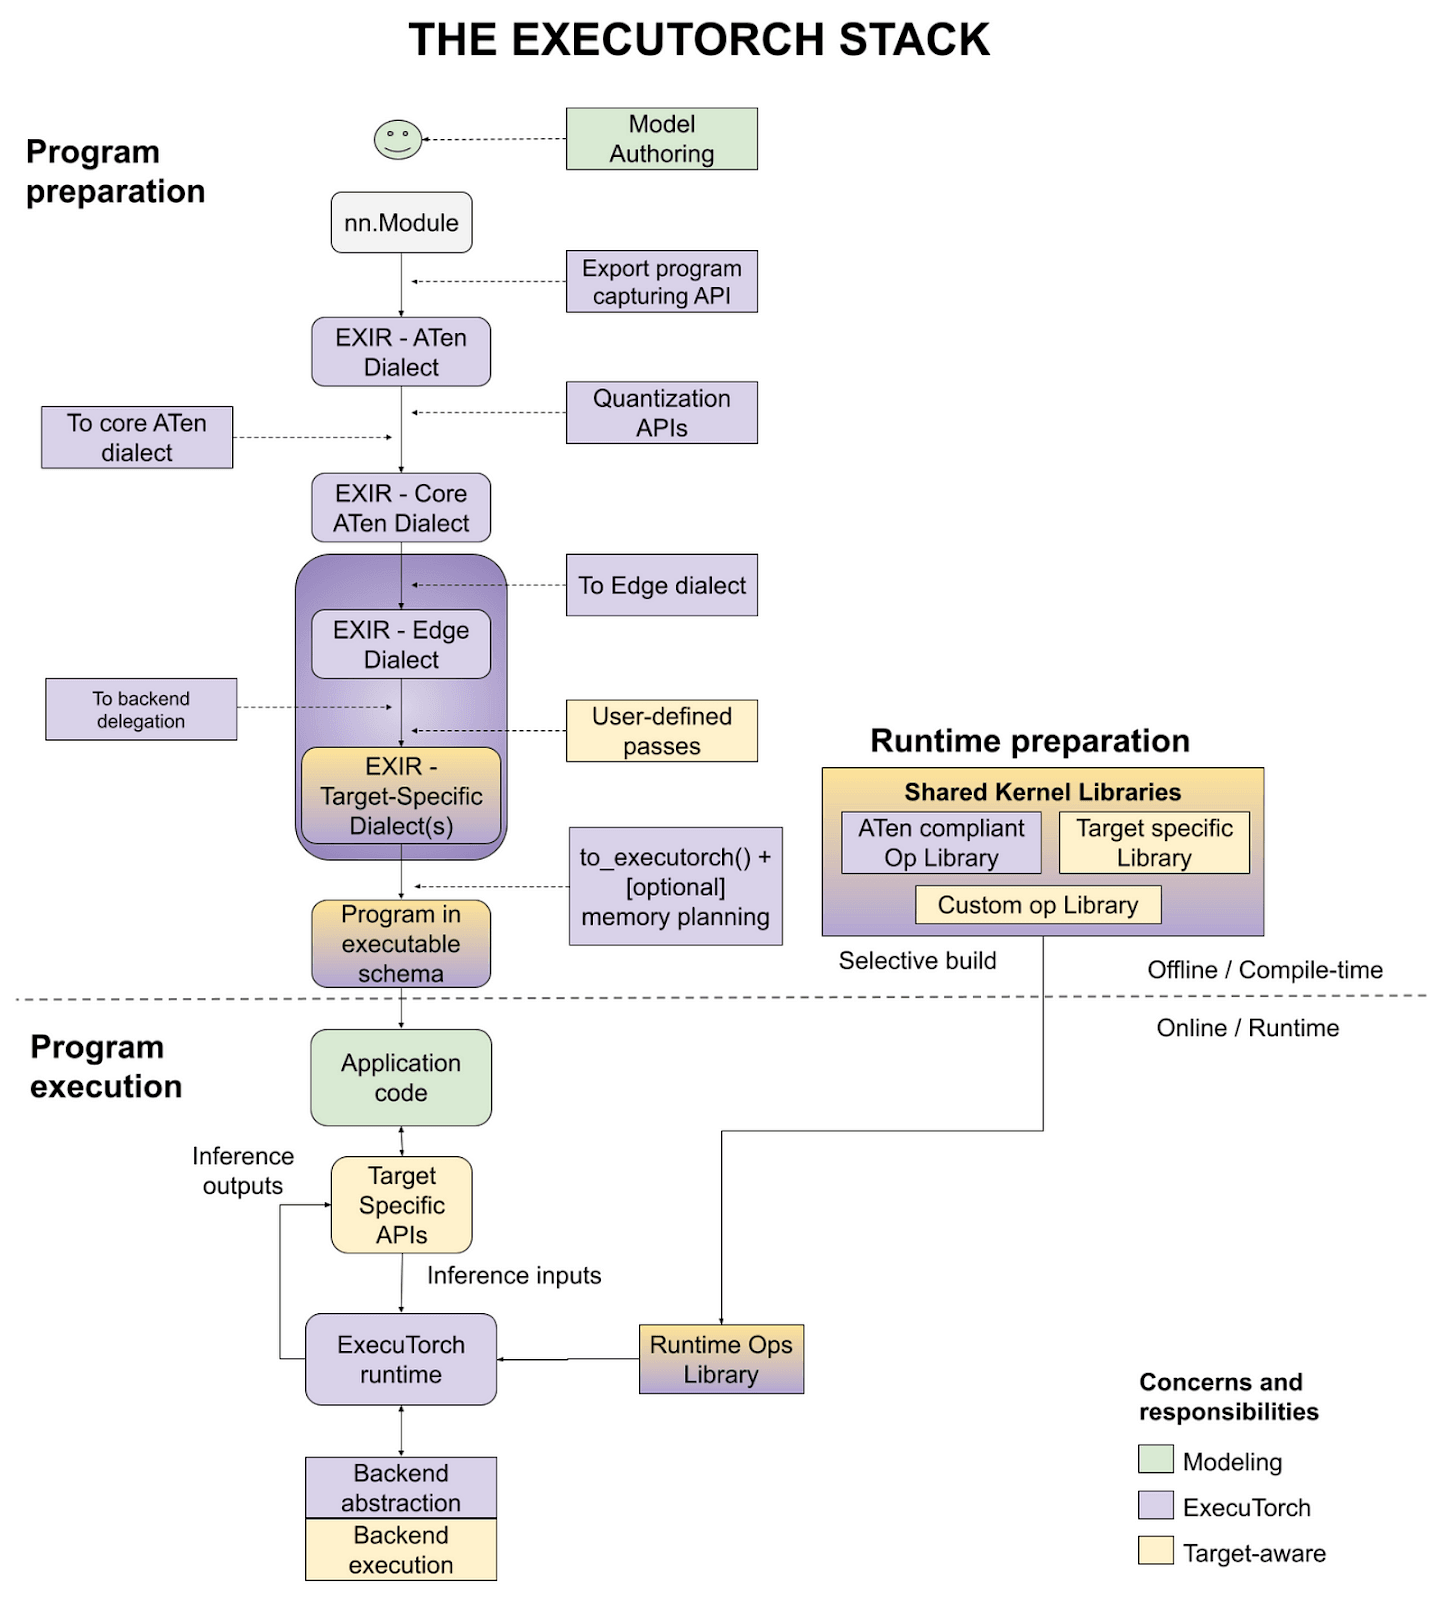
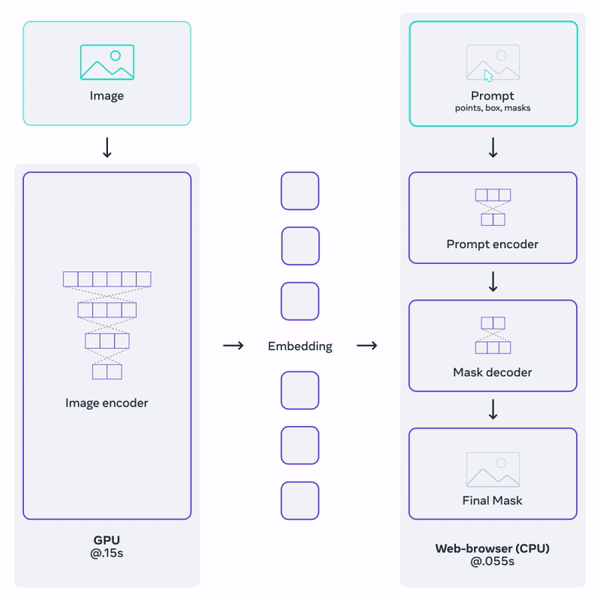
ExecuTorch Export Flow
To run a model on a device, you first need to translate it into a computation graph. This is done with torch.export. Then, translate this graph into the edge dialect, optionally applying quantization beforehand. Now, some operations or the entire model might be delegated to the backend. At the end, we translate operations into an executable schema that is used on the device. Below is a picture presenting the graphical representation of the ExecuTorch workflow.
As ExecuTorch is still in the beta phase, it is under dynamic development, and every day there are numerous improvements and fixes added to the repository. So, stay tuned with updates from ExecuTorch, as the user experience and variety of tools will continue to get better and better.
Integrations and Results
App Walkthrough
Now, let’s move on to the presentation of our prototype. We will guide you through our app with a simple example.
First, we need to select an image that we want to inpaint. If we’re satisfied with the image, then we can move to the next screen and select a reference image. Both steps are presented in the images below.
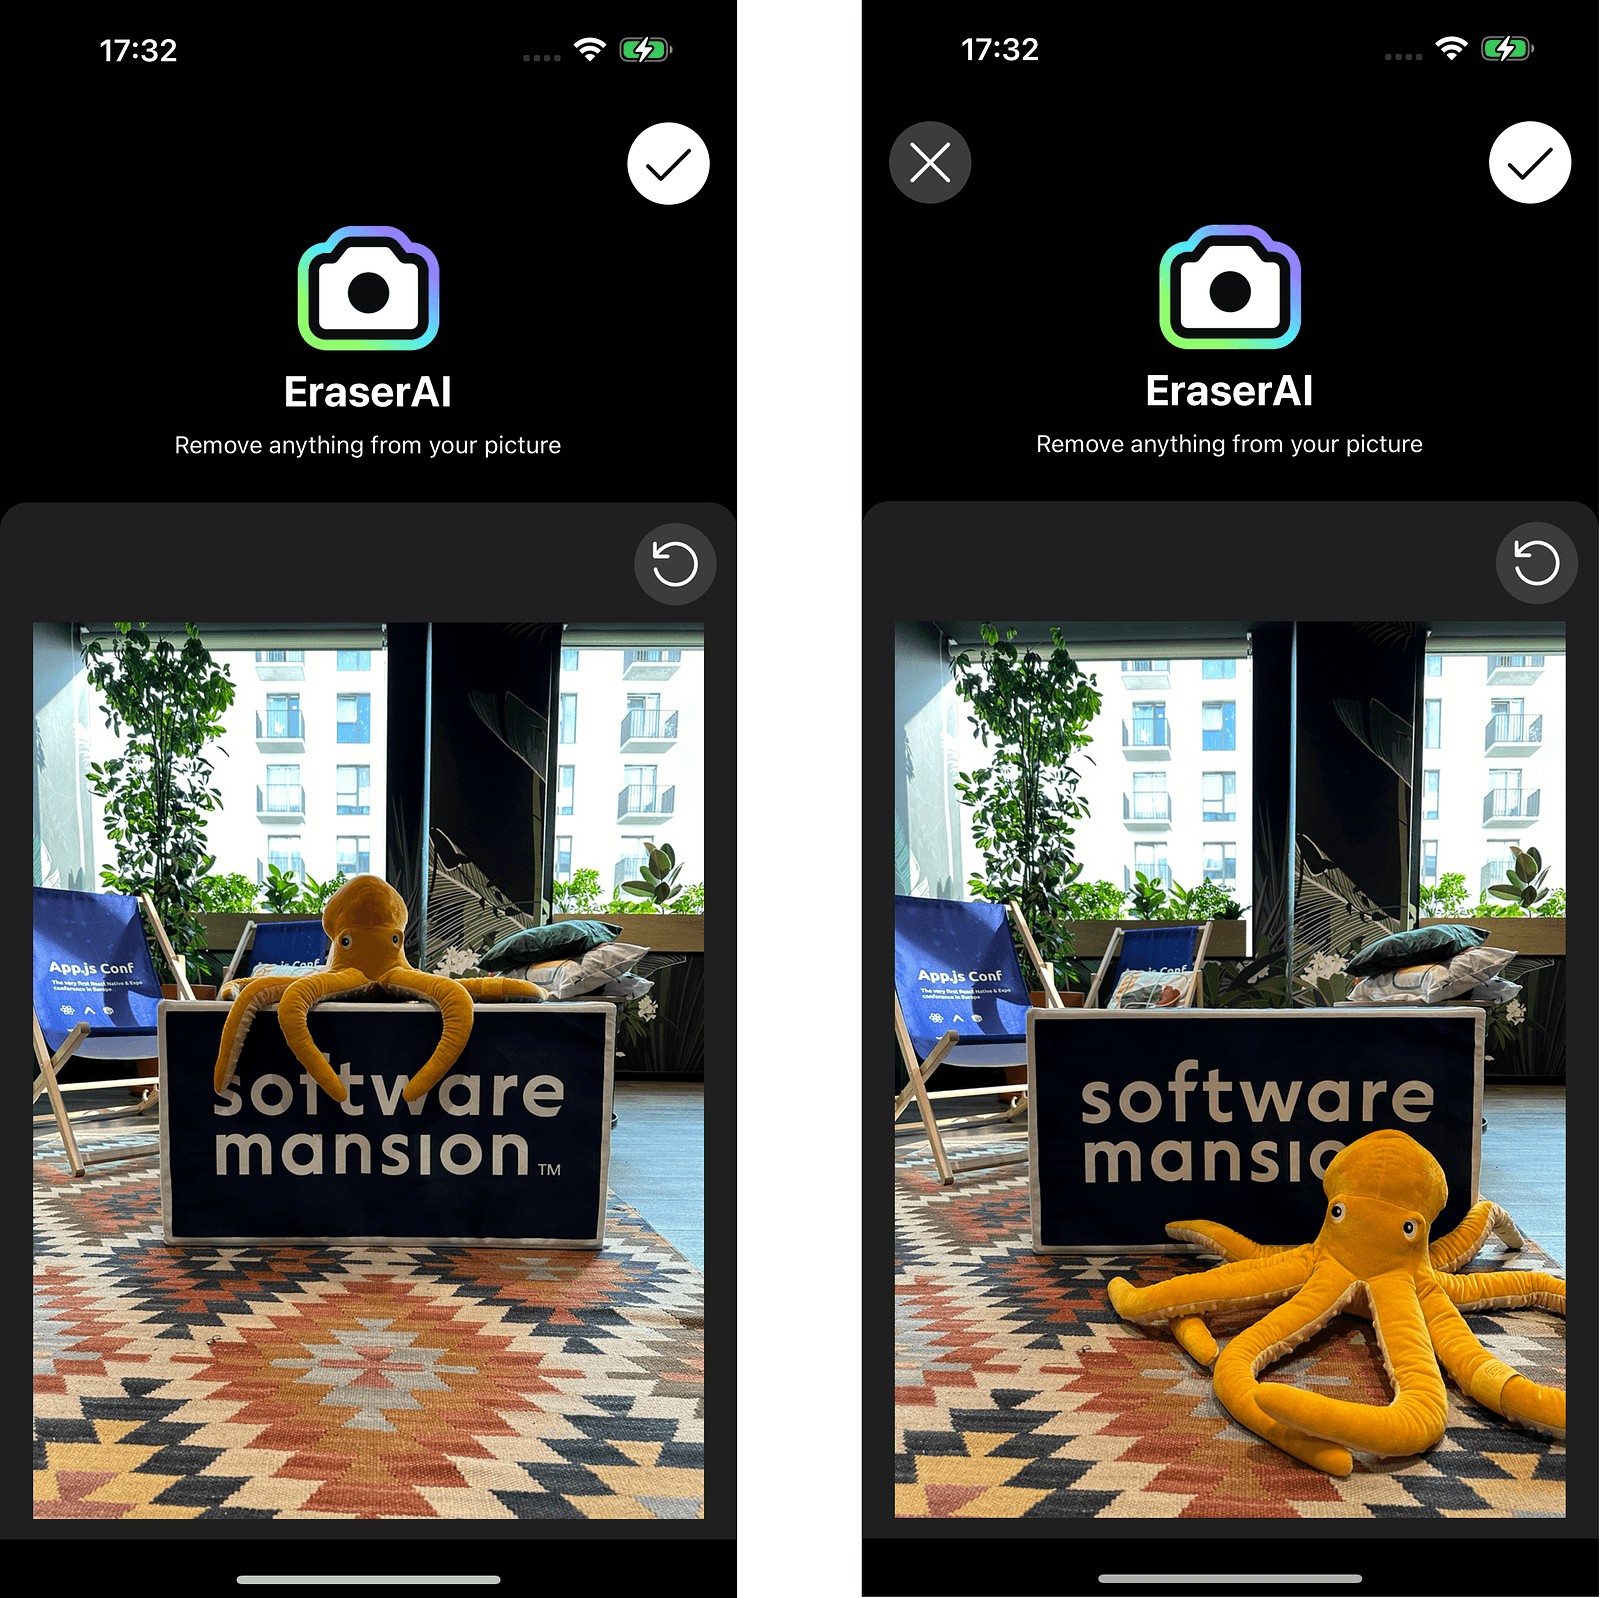
Next, we select a mask to be inpainted. Here, we use the segmentation model to select all the masks based on clicks on the screen. Each tap generates a single mask. We can press the screen multiple times, effectively combining many different masks into one resultant mask. Once satisfied with the mask, hold the miniature of the masked area and proceed to the next step. Below, we present an example mask created with just one touch on the screen.

The final step is the inpainting itself. The resultant image does not contain an octopus as we inpainted it using reference image.

Performance and Usability
At the end of this article, we aim to discuss the performance optimizations implemented in our app. To significantly boost its overall performance, we chose CoreML as the backend delegate. Thanks to this enhancement, the total runtime of both masking and inpainting modules on iPhone 14 Pro Max is now reduced to less than 1.52 seconds — remarkably fast! By contrast, using the native Samsung inpainting app, which relies on cloud computations, the time taken to inpaint the image in Figure 1 was over 45 seconds on Samsung Galaxy S24 (across four sequenced inferences).
Last but not least, ExecuTorch offers an easy-to-use interface for both model exporting and operation. While hard to quantify, the intuitiveness of these tools is crucial when developing larger applications. In comparison, the alternative app for exporting models, TensorFlow Lite, provides a less user-friendly interface for accomplishing similar tasks.
Conclusion
To sum up, ExecuTorch is a perfect tool if you value both portability and performance, all fully integrated with the PyTorch ecosystem. It has an easy and well-documented export process. So, if you want to use your AI model on an edge device like a mobile phone, microcontroller, etc., then we highly recommend ExecuTorch.
Next Steps
Our app is still under development. We plan to release our app on the App Store. Currently, our software is available only for iOS, but we also plan to develop a version for Android. We still need to work on the quality of the inpainting itself. In the near future, we plan to share a repository with the code of the application, so stay tuned and wait for updates!
Appendix A — Segmentation Model
We decided to use a segmentation module from the family of Segment Anything models. The Segment Anything model was first introduced by Meta in 2023 in this paper, and developed by Meta AI Research. Without going into details, the Segment Anything Model (SAM) consists of three parts:
- Heavyweight Image Encoder
- Prompt Encoder
- Mask Decoder
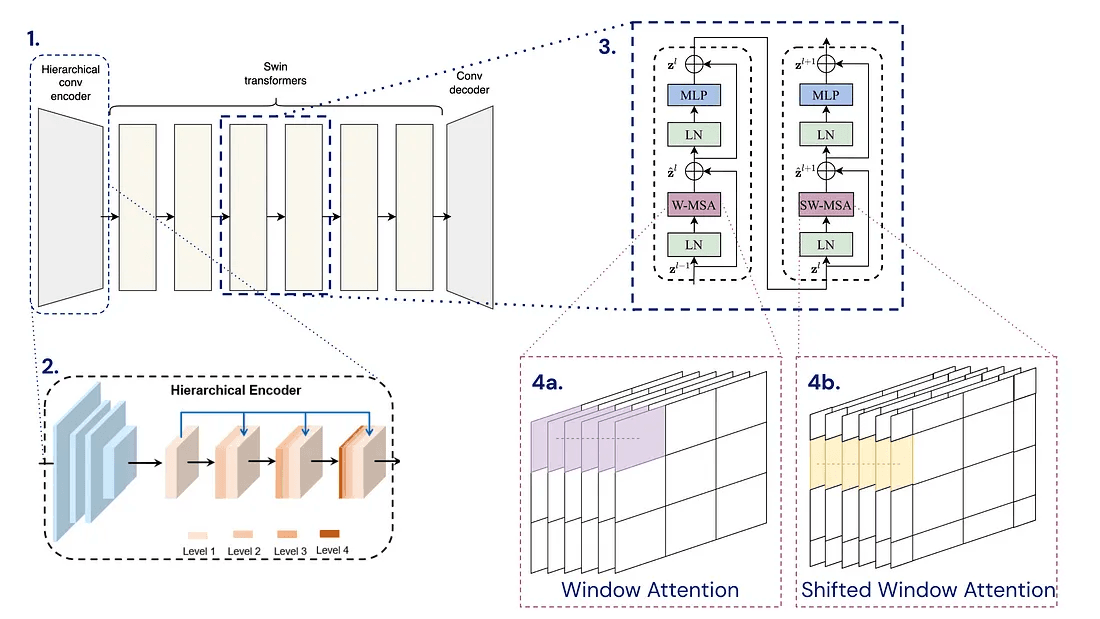
The image encoder takes an input image and returns image embeddings. The prompt encoder accepts various types of prompt inputs such as points, boxes, or predefined masks, and returns prompt embeddings. Both the image and prompt embeddings are then passed to the mask decoder, which outputs the resultant mask(s). As some prompts might be ambiguous, the SAM was trained to return either one or three masks. The workflow is presented in Figure 9. To learn more about the SAM model, we strongly advise you to read the above-linked paper.
However, the models provided by Meta were not exactly suitable for our purpose as they were too large for mobile devices. Fortunately, many variations of the original model have been created, and we decided to choose one of them. Our choice was EfficientSAM, developed by Yunyang Xiong et al. It is a distilled version of the original SAM, offering a decent tradeoff between model size and segmentation quality.
Appendix B — Inpainting Model
Our inpainting model comes from what we used for video reference inpainting. It adopts an encoder-decoder framework based on the spatial-temporal decouple method, a concept introduced by Rui Liu et al. (DSTT). The process starts with the input passing through a hierarchical convolutional encoder. This is followed by several blocks of Swin Transformers, which are detailed extensively in the paper. Outputs from these blocks then feed into a convolutional decoder. Below is a graphic that explains the architecture of the model.
The inpainting model was trained on Youtube VOS and then fine-tuned on DPED50k (available on this repository). Both datasets consist of various images like buildings, objects, etc. Additionally, DPED50k is provided with a set of masks.