
Creating an Android Application With Starknet-JVM and Jetpack Compose
 Artur Michalek•Feb 22, 2023•9 min read
Starknet-JVM is a library written in Kotlin for all JVM languages that simplify interactions with the Starknet network. In this article, we will go through the setup of the Starknet account and we will create an Android application that utilizes starknet-jvm for core interactions with Starknet. We will also show how to install the library using Gradle.
This article assumes some initial knowledge about:
- Android application development and Jetpack Compose
- Blockchain
- ERC-20 contracts
A finished application from this article can be found on GitHub.
Initial setup
Installation
We will be using Android Studio with Gradle.
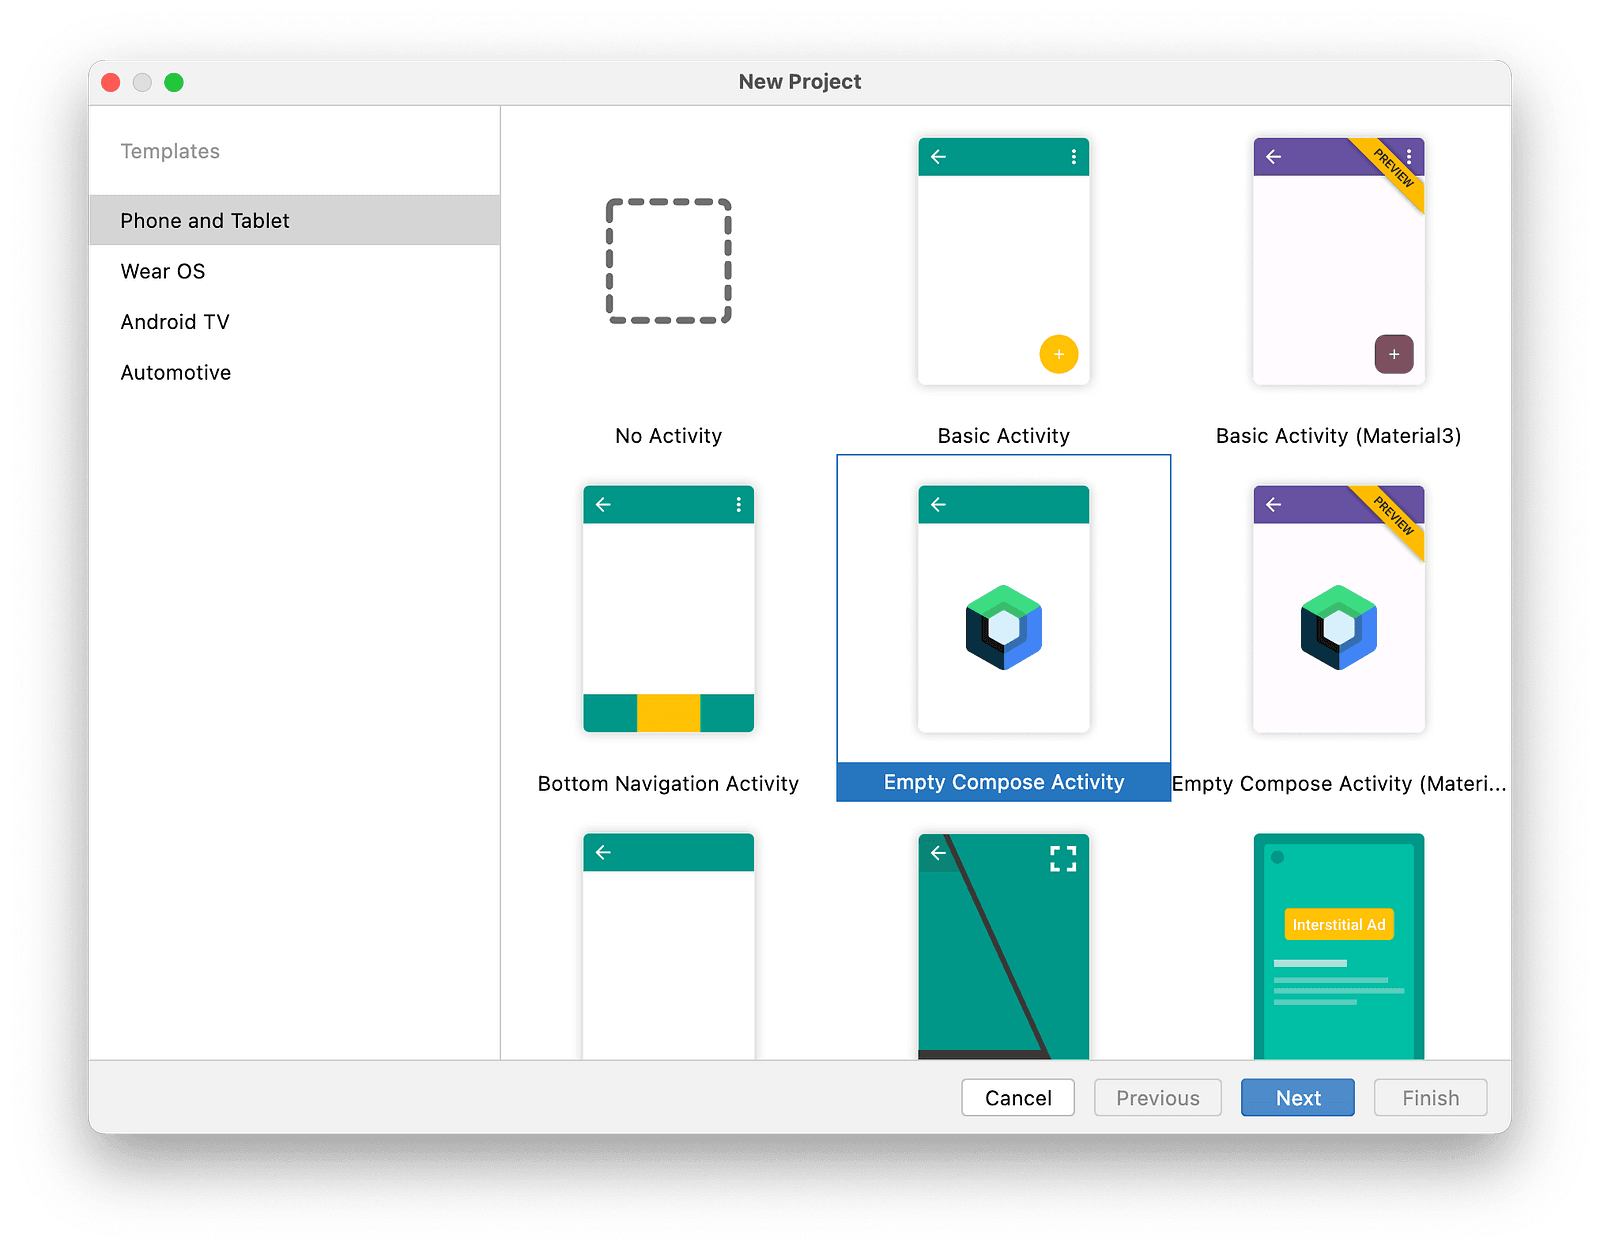
Let’s create a new project using the “Empty Compose Activity” template.
Once it’s created, starknet-jvm needs to be added to the “app” build.gradle file.
implementation('com.swmansion.starknet:starknet:0.5.0@aar') {
   transitive = true
}
Make sure to include transitive = true. By default, Gradle will not install package dependencies when using @aar, which will cause errors in runtime.
Account creation
The easiest way to get started with Starknet is through the official CLI which is a part of the cairo-lang python package.
Follow this guide for installation instructions: https://www.cairo-lang.org/docs/quickstart.html
Once cairo-lang is installed, we can proceed with account creation: https://www.cairo-lang.org/docs/hello_starknet/account_setup.html
If you followed all steps correctly, your account will be set up and ready to use. We will not be using the CLI for the rest of the article. Once deployed, the account details can be found in
~/.starknet_accounts/starknet_open_zeppelin_accounts.jsonGo ahead and verify you have your details there. They’ll prove useful in the next parts of the article.
App
Now we will create an Android application with Jetpack Compose that will allow querying the Starknet ETH token balance and making token transfers of any amount to addresses on the Starknet network.
Calling Contracts
First, let’s create a function that will call the ETH ERC-20 contract on Starknet and return the result of that call. Please note that, while we won’t be deploying any new contracts in this article, it is possible to do so through starknet-jvm. See the API reference for more details.
First, make sure your AndroidManifest.xml contains the following line directly between <manifest></manifest> tags.
<uses-permission android:name="android.permission.INTERNET" />Now we need to create a checkBalance function that will query Starket for the account balance.
suspend fun checkBalance(accountAddress: Felt): Uint256 {
    // Create a testnet provider
    // Testnet is a separate Starknet test network operating alongside Starknet Mainnet
    val provider = GatewayProvider.makeTestnetProvider()

    // Create a call to Starknet ERC-20 ETH contract
    val call = Call(
        // `contractAddress` in this case is an address of ERC-20 ETH contract on Starknet testnet
        contractAddress = Felt.fromHex("0x049d36570d4e46f48e99674bd3fcc84644ddd6b96f7c741b1562b82f9e004dc7"),

        // `entrypoint` can be passed both as a string name and Felt value
        entrypoint = "balanceOf",

        // `calldata` is always required to be `List<Felt>`, so we wrap accountAddress in `listOf()`
        calldata = listOf(accountAddress)
    )

    // Create a Request object which has to be executed in synchronous
    // or asynchronous way
    val request = provider.callContract(call)

    // Execute a Request. This operation returns JVM CompletableFuture
    val future = request.sendAsync()

    // Await the completion of the future without blocking the main thread
    // this comes from `kotlinx-coroutines-jdk8`
    val balance: List<Felt> = future.await()

    // balanceOf returns the result as Uint256 which in Starknet is encoded as two Felts:
    // high and low. We can convert it to more readable value using starknet-jvm
    val (low, high) = balance
    return Uint256(low = low, high = high)
}First we create a GatewayProvider: Currently, two options for communicating with Starknet exist — central gateway and Starknet nodes. While the latter is more future-proof, we’ll focus on the gateway in this guide, for setup simplicity. To use a node, simply replace the GatewayProvider with the JsonRpcProvider.
Next, we create a Call object, which requires three arguments. They may be passed in multiple formats, but under the hood, we use Felt (a field element). It’s a type unique to Starknet, if you are interested in learning more about Felt, please refer to https://starknet.io/docs/how_cairo_works/cairo_intro.html#field-elements
After that, we create a Request object. It represents an interaction with Starknet that can be executed synchronously or asynchronously, using the JVM CompletableFuture. We do support Kotlin’s coroutines out of the box, but thekotlinx-coroutines-jdk8 library provides a compatibility layer between these.
The balanceOfhttps://docs.openzeppelin.com/contracts-cairo/0.3.1/erc20#balanceof method in the ERC-20 accepts an account address Felt and returns the balance as an unsigned 256-bit number — an Uint256. Because Uint256 is too big to be stored inside a Felt, it has to be encoded as two values — one Felt for the low 128 bits and one for the high. Starknet-jvm `Uint256` object can be then created from these two values.
Now that we have a way of interacting with Starknet, let’s create a basic component that will call the contract and display the result.
@Composable
fun Main() {
// Create a variable that will store the address of our account
// Replace "0x1234" with your own address
// By default, it can be found in
// ~/.starknet_accounts/starknet_open_zeppelin_accounts.json
val accountAddress = Felt.fromHex("0x1234")
// Create a coroutine scope
val scope = rememberCoroutineScope()
var balance by remember { mutableStateOf(Uint256.ZERO) }
val queryStarknetOnClick: () -> Unit = {
scope.launch {
balance = checkBalance(accountAddress)
}
}
Column(modifier = Modifier.padding(16.dp)) {
Text(text = "Current balance: ${balance.value} wei")
Button(onClick = queryStarknetOnClick) {
Text(text = "Check Balance")
}
}
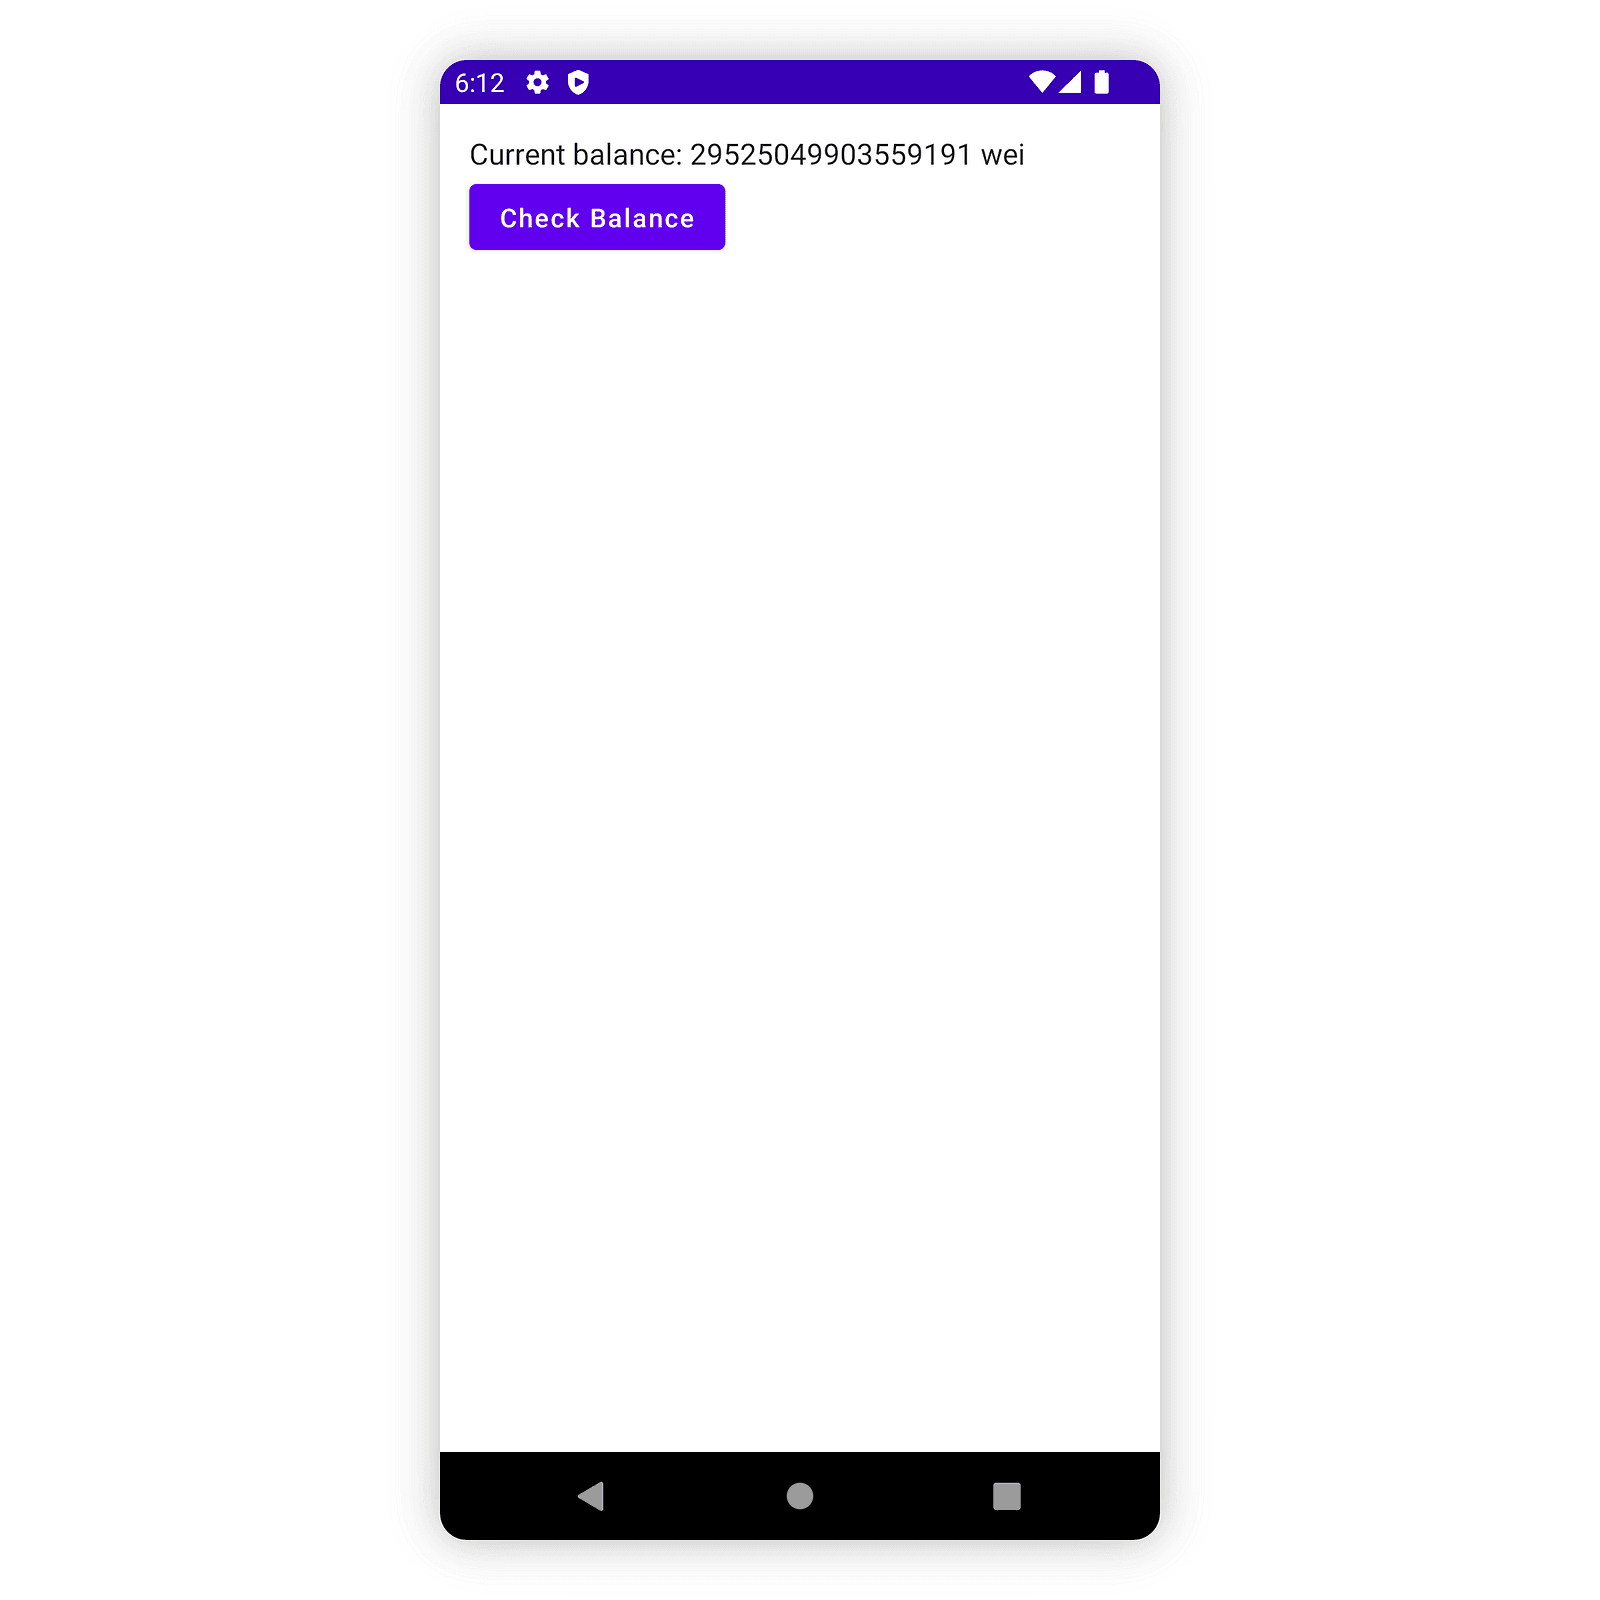
}At this point, your application should have the first working functionality. Go ahead and run it in the Android Studio emulator. If you provided the correct address of the account, your balance should be displayed after clicking the “Check Balance” button.
Sending a transaction
Let’s introduce the ability to modify the state of the contract now. We’ll need to send a transaction to Starknet using the account that was created previously. As written before, account details can be found under ~/.starknet_accounts/starknet_open_zeppelin_accounts.json.
For now, the account address and private key will be hardcoded into the app. This is not the recommended approach for real-world applications! Always follow best security practices when developing applications. You can read more about them at https://developer.android.com/topic/security/best-practices and about the Android Keystore system https://developer.android.com/training/articles/keystore in the official documentation.
suspend fun transferToken(
    recipientAddress: Felt,
    amount: Uint256
): InvokeFunctionResponse {
    val provider = GatewayProvider.makeTestnetProvider()

    // Create an account instance
    // Replace placeholder values with your account details
    val address = Felt.fromHex("0x1234")
    val privateKey = Felt.fromHex("0x1111")
    val account = StandardAccount(address, privateKey, provider)

    // Create a call to ERC-20 contract that will be sent in transaction
    val call = Call(
        Felt.fromHex("0x049d36570d4e46f48e99674bd3fcc84644ddd6b96f7c741b1562b82f9e004dc7"),
        "transfer",
        listOf(recipientAddress) + amount.toCalldata()  // Uint256 can be converted to calldata (list of Felts) easily
    )
    // Create a Request that will send a transaction
    val transaction = account.execute(call)

    // Send a transaction
    return transaction.sendAsync().await()
}
This function invokes ERC-20 contract’s transfer method, which takes two arguments: recipientAddress and the amount to be transferred.
Note that the transfer method expects the amount to be an encoded Uint256. This is similar to the checkBalance response but in reverse: Starknet expects the Uint256 to be encoded as two consecutive Felts. The conversion can be done using the toCalldata method, which returns a List<Felt> with the correct encoding.
While Provider#callContract is a different method from Account#execute, we are still first constructing an Call object that will be then converted into a transaction calldata.
Unlike the Provider#callContract which returned a result immediately, Account#execute returns an InvokeFunctionResponse with the transaction hash. Making a transfer requires changing the blockchain state — a transaction has to be executed and included in a block, which takes some time. It wouldn’t make sense for the application to freeze until the transaction is completed.
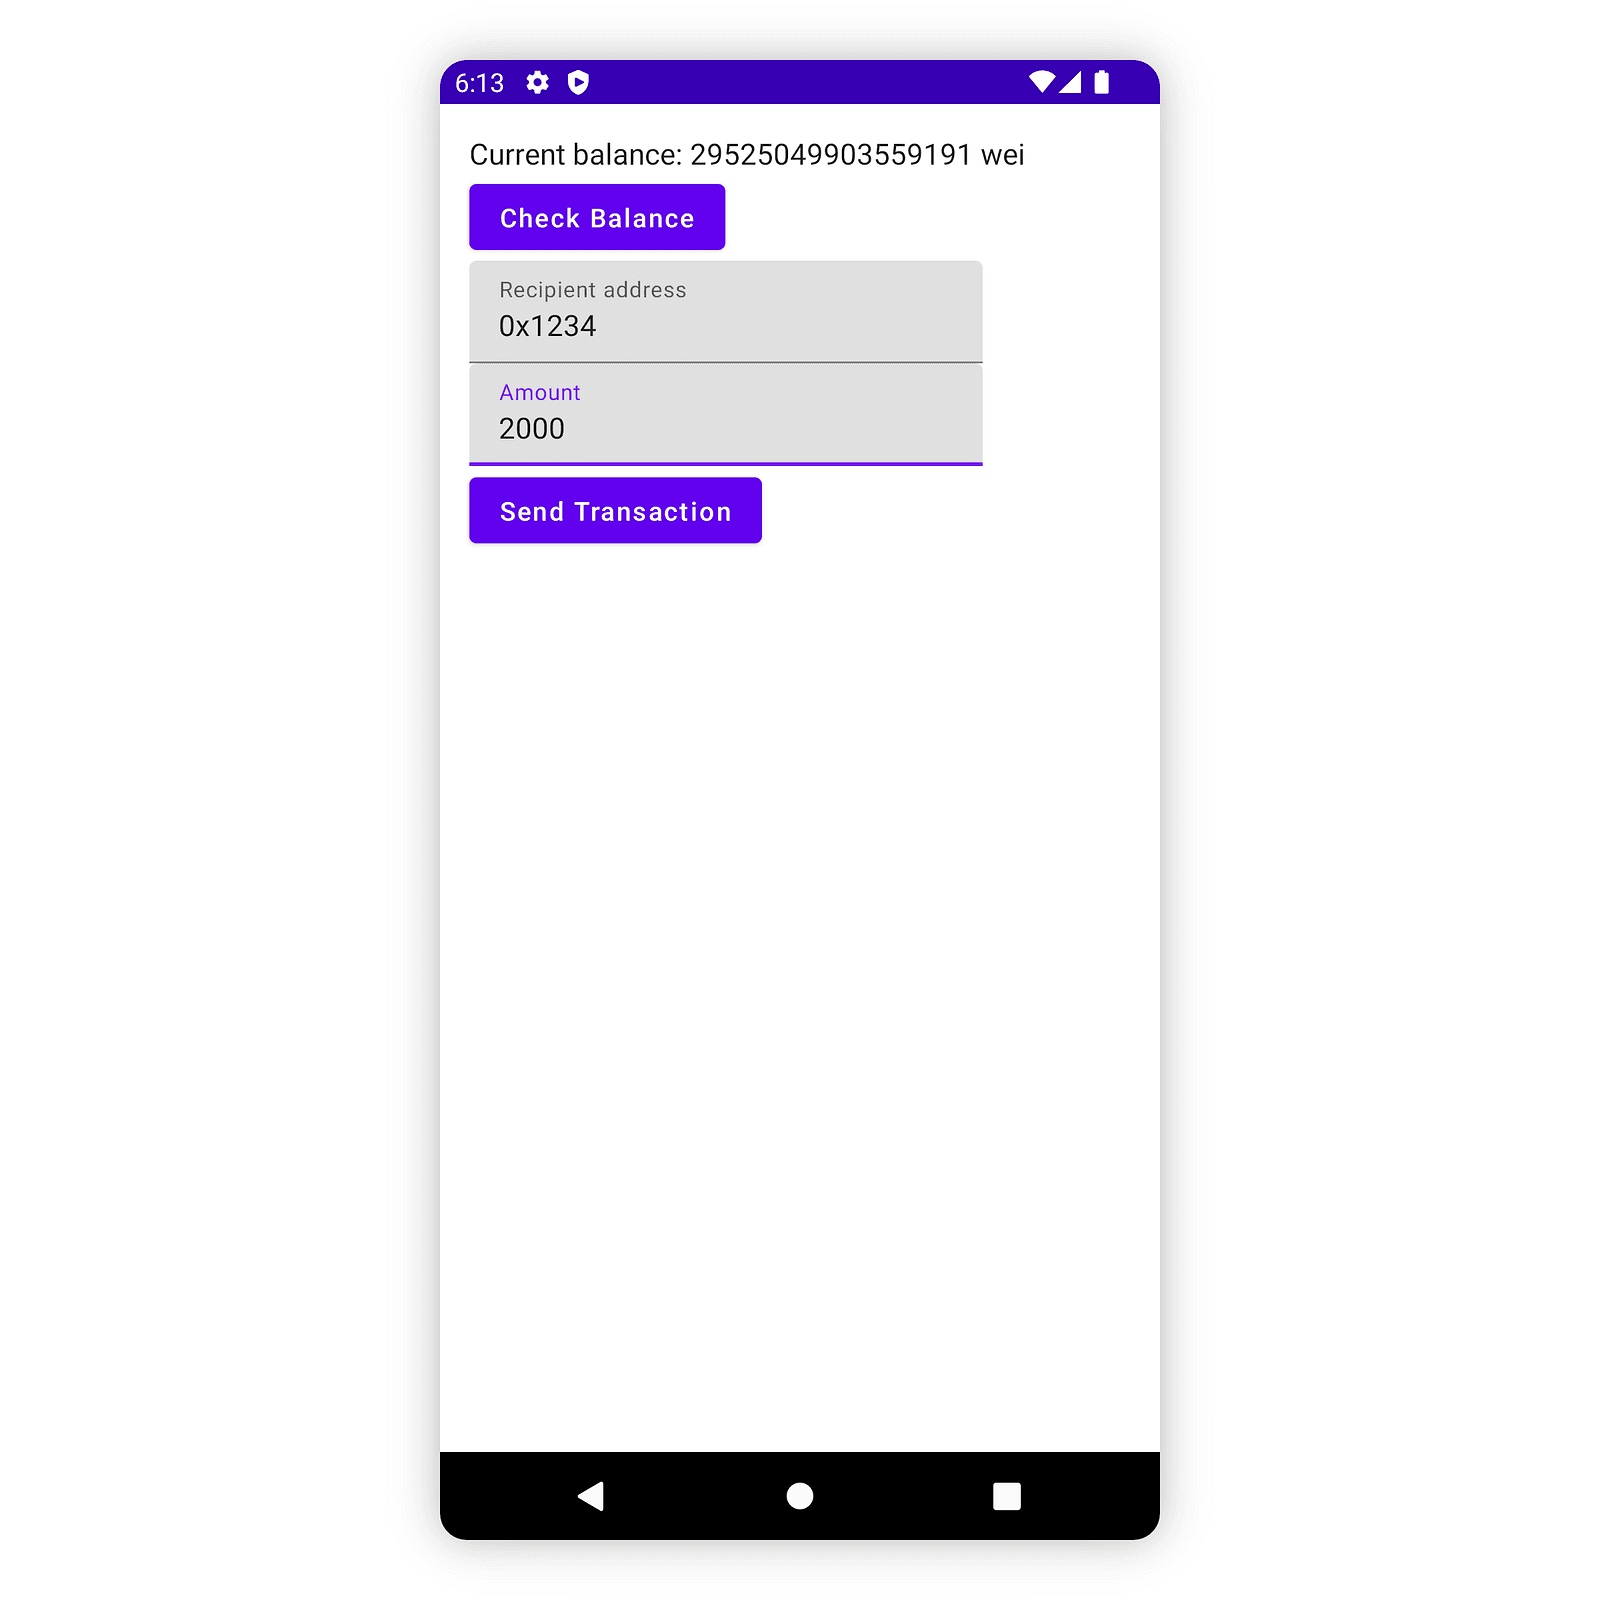
Let's create a UI for the transferToken. If you are interested in the code for the ValidatedTextField, it can be found in the project repository.
@Composable
fun Main() {
    // ...

    var transactionHash by remember { mutableStateOf(Felt.ZERO) }

    // ...

    val sendTransactionOnClick: () -> Unit = {
        scope.launch {
            transactionHash = transferToken(
                recipientAddress = Felt.fromHex(recipientAddress),
                amount = Uint256(BigInteger(amount)),
            ).transactionHash
        }
    }

    Column(modifier = Modifier.padding(16.dp)) {
        Text(text = "Current balance: ${balance.value} wei")
        Button(onClick = queryStarknetOnClick) {
            Text(text = "Check Balance")
        }
        if (transactionHash != Felt.ZERO) {
            Text(text = "Transaction hash: ${transactionHash.hexString()}")
        }

        ValidatedTextField(
            value = recipientAddress,
            isError = isErrorAddress,
            labelText = "Recipient address",
            errorText = "Invalid address",
            onValueChange = {
                validateAddress(it)
                recipientAddress = it
            }
        )

        ValidatedTextField(
            value = amount,
            isError = isErrorAmount,
            labelText = "Amount",
            errorText = "Invalid amount",
            onValueChange = {
                validateAmount(it)
                amount = it
            }
        )

        Button(onClick = sendTransactionOnClick, enabled = !isErrorAddress && !isErrorAmount) {
            Text(text = "Send Transaction")
        }
    }
}
Checking the transaction receipt
To see if a transaction succeeded, we can query Starknet for transaction receipt and check its status.
suspend fun checkInvokeTransaction(transactionHash: Felt): TransactionReceipt? {
    val provider = GatewayProvider.makeTestnetProvider()

    return try {
        // Create an receipt Request
        val request = provider.getTransactionReceipt(transactionHash)
        request.sendAsync().await()
    } catch (e: RequestFailedException) {
        // We need to catch en exception here, because getTransactionReceipt
        // throws on unknown transactions.
        null
    }
}
Let’s create a TransactionStatusDisplay component to show the details of our transaction.
@Composable
fun TransactionStatus(receipt: TransactionReceipt?, onClick: () -> Unit) {
Column {
if (receipt != null) {
Column {
Text(text = "Transaction Receipt", style = MaterialTheme.typography.h5)
Text(text = "Status: ${receipt.status}")
Text(text = "Fee paid: ${receipt.actualFee?.decString()} wei")
}
}
Button(onClick = onClick) {
Text(text = "Check Transaction Status")
}
}
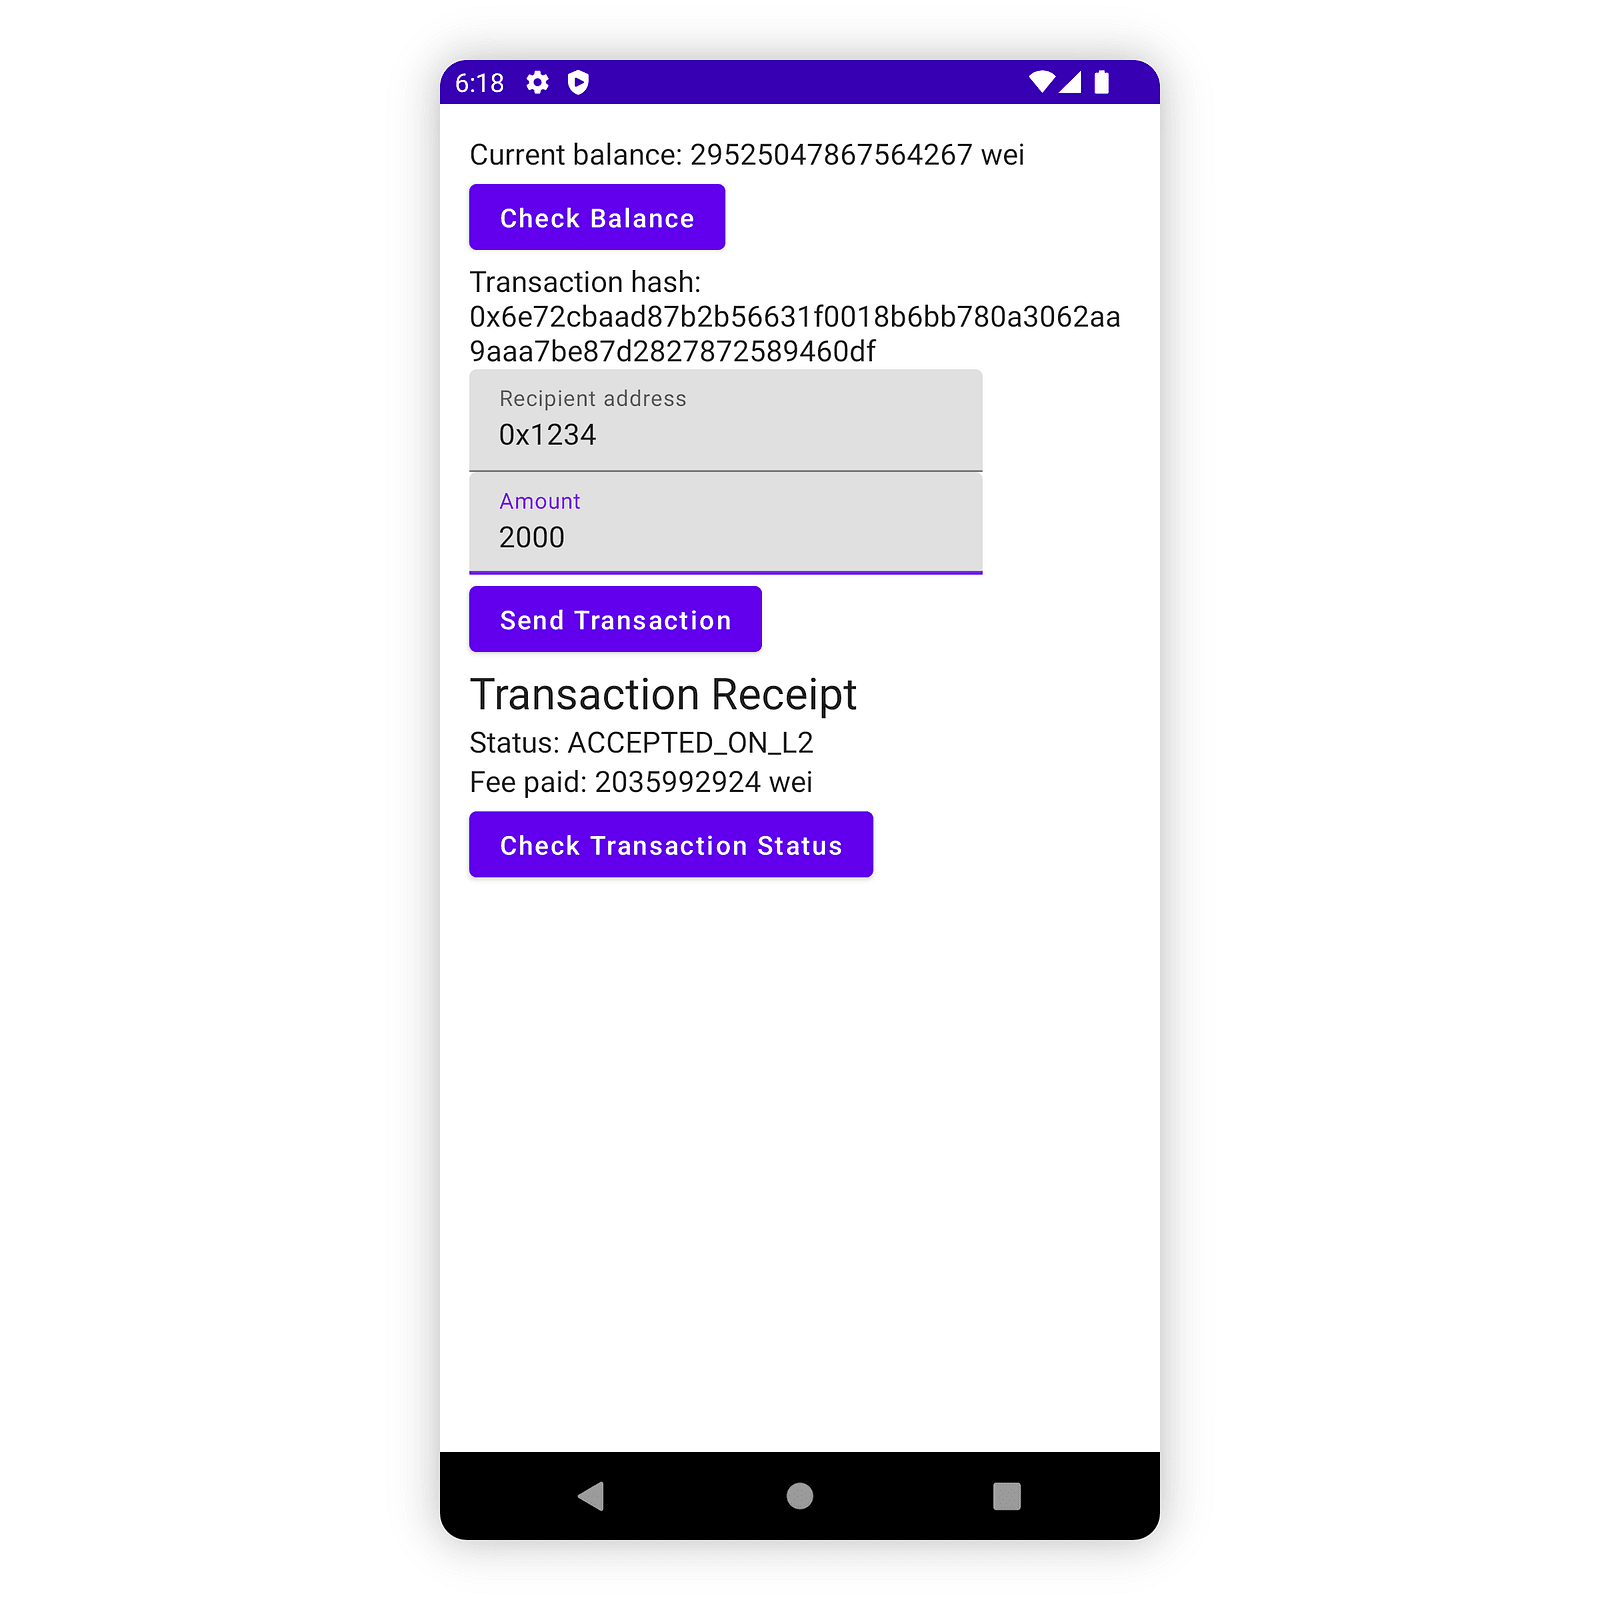
}Receipts can have multiple parameters depending on the transaction and Provider type. We won’t cover all of them, but let’s take a look at an actualFee argument: It represents the total amount of tokens that was paid for the transaction execution.
On Starknet, similarly to the Ethereum network, executing transactions requires paying some amount of tokens as a fee, max amount of which is controlled by the maxFee argument of a transaction.
Account#execute can be used both with and without maxFee. If it is not provided, starknet-jvm will automatically estimate the required fee.
Conclusion
At this point, your application should allow querying the balance of your account, making token transfers to any address on the network, and checking the status of such transactions. While we just dipped our toes in Starknet application development, what we created can be a foundation for your future Starknet projects.
For more information on Starknet development check out the official guide and starknet-jvm documentation available both in Kotlin and Javadoc flavors.
The complete application from this article can be found on GitHub.