
Building an Integrated React Native Brownfield App Using Expo: Step-by-Step Android Guide
 Dawid Matyjasik•Nov 17, 2025•16 min read
Building an Integrated React Native Brownfield App Using Expo — Android Guide

Mobile development often starts with a choice: begin a new project from scratch or merge React Native into your existing app. The second approach, known as a brownfield setup, is especially useful when a native app is already in production but needs to gain the flexibility and speed of React Native.
Expo has traditionally been viewed as a tool for greenfield apps — projects created entirely with React Native from day one. However, it now provides solutions for brownfield development as well, making it possible to integrate React Native features directly into native environments without sacrificing existing infrastructure.
Let’s explore how brownfield development works with Expo, the differences between integrated and isolated approaches, and why an integrated setup offers the best balance of flexibility and developer experience. We’ll focus on practical aspects, using Android as the primary example.
Understanding brownfield vs. greenfield
In mobile development, the choice between greenfield and brownfield sets the direction for the entire project. While greenfield offers a fresh start, brownfield unlocks unique advantages for teams managing existing native applications.
Greenfield in short
A greenfield project begins with a completely new app. It provides freedom, clean architecture, and no legacy code to worry about. But it also demands more time, resources, and effort, since every part of the app must be written from scratch.
For an established business, this often turns into a challenge that is almost impossible to justify. Picture a large e-commerce company with millions of active users. Its native app has been growing for years, layer upon layer of features: secure payments, product recommendations, loyalty programs, and push notifications that drive daily engagement. The app works, customers rely on it, and revenue flows through it every single day.
Now imagine telling that company to stop everything and rebuild the app. Development of new features would slow down or even pause. Two separate versions of the app would need to be maintained until the rewrite was ready, doubling the workload. And when the new app finally launched, it would need to perfectly replicate years of refinements just to catch up with what already existed. The risk of bugs, regressions, and unhappy users would be enormous.
Why brownfield matters
A brownfield project allows React Native to be integrated directly into an existing native app. Instead of throwing away years of development, brownfield builds on top of what is already in production. This approach creates several important advantages:
- Parts of the app can be rewritten one by one, without forcing a risky, all-at-once rewrite. For example, a single flow like onboarding or checkout can move to React Native, while the rest of the app stays native.
- A native app with millions of users cannot simply be replaced overnight. Brownfield makes it possible to modernize without disrupting users.
- Reuse of existing code, core features that already work well in native can stay unchanged, while React Native handles the parts where flexibility and speed matter the most.
- Instead of maintaining two fully separate codebases, teams can incrementally share more and more logic across platforms.
When does brownfield development make sense?
Brownfield is especially useful in case of:
- Large native apps with complex infrastructure, where rewriting everything would take years.
- Businesses that need to keep shipping updates to production while modernizing their stack.
- Teams interested in React Native but not prepared to fully migrate their app.
- Companies looking to speed up development for certain parts of the app, while leaving performance-critical features in native code.
In short, brownfield bridges the gap between existing stability and modern flexibility. It provides a safe path for adopting React Native in mature apps, letting teams innovate faster without starting over.
Integrated vs. isolated
When setting up a brownfield app with React Native, you can choose between two main architectural approaches: integrated and isolated. Both aim to bring React Native into an existing native environment, but they differ in how deeply the frameworks are connected and how the codebases communicate with each other.
The isolated approach
In the isolated setup, React Native lives in its own sandbox. It’s added to the native app as a separate module or “island” that runs independently. Each React Native screen or feature is bundled separately and loaded only when needed. This keeps the native and React Native parts of the app loosely coupled — they share minimal dependencies and communicate primarily through explicit bridges or deep links.
This approach is often chosen when:
- React Native is used for a limited part of the app, such as a single experimental feature.
- The native infrastructure or build system should remain untouched.
- The team wants to evaluate React Native without major structural changes.
The isolated model provides safety and control. Native and React Native can evolve independently, and failures in one don’t directly affect the other.
However, this separation comes at a cost, managing multiple bundles, navigation contexts, and shared state between native and RN components quickly becomes complex. Each integration point requires custom bridging, which reduces the speed benefits React Native is known for.
The integrated approach
In the integrated setup, React Native becomes a first-class citizen of the app. Instead of being an isolated module, it’s embedded more tightly into the native environment, sharing build tools, navigation, analytics, and configuration with the rest of the project. The native and React Native layers communicate seamlessly, often using shared routing and dependency injection systems.
In practice, this means:
- The same navigation stack can transition smoothly between native and React Native screens.
- Shared state, configuration, and analytics are consistent across the app.
- The app can share one unified bundle, reducing complexity and improving startup performance.
Integrated architecture is particularly effective when React Native powers multiple screens or critical user flows. It creates a cohesive developer experience — teams can use the same tooling, debugging, and CI/CD pipelines across native and RN code. It also makes it easier to gradually expand React Native’s footprint over time.
For this article we chose the integrated approach because it offers the best balance between maintainability and developer experience. It allows us to leverage Expo’s modern toolchain while keeping full compatibility with native infrastructure, a combination that makes hybrid development feel truly unified rather than patched together.
Implementing brownfield on Android
Step 1: Project setup
Before integrating React Native into an existing native environment, we first need a clean Expo project configured for the brownfield setup.
Start by creating a new typescript based Expo app:
npx create-expo-app@latest --template blank-typescriptFor this guide, we’ll name our project expo-brownfield:

Once the project is created, navigate to the directory and prebuild it for Android:
cd expo-brownfield && npx expo prebuild --platform android --cleanThis command generates the native Android directory structure and config files required for integration. The --clean flag ensures that everything starts fresh, avoiding potential conflicts from previous builds.
Step 2: Integrating a native entry point
Now that the Expo project is prebuilt, we can simulate a realistic brownfield environment by adding native Activity. This will serve as a standalone native screen that can later launch a React Native view, just like in a production hybrid app.
This Activity represents a typical native screen — it could be a dashboard, onboarding flow, or any part of an existing app that later transitions to React Native:
// android/app/src/main/java/com/dawidmatyjasikswm/expobrownfield/NativeActivity.kt
package com.dawidmatyjasikswm.expobrownfield

import android.app.Activity
import android.os.Bundle
import android.widget.TextView
import android.widget.LinearLayout
import android.view.Gravity
import android.graphics.Color

class NativeActivity : Activity() {
    override fun onCreate(savedInstanceState: Bundle?) {
        super.onCreate(savedInstanceState)

        val layout = LinearLayout(this).apply {
            orientation = LinearLayout.VERTICAL
            gravity = Gravity.CENTER
            setBackgroundColor(Color.WHITE)
        }

        val helloText = TextView(this).apply {
            text = "Hello World"
            textSize = 24f
            setTextColor(Color.BLACK)
            gravity = Gravity.CENTER
        }

        layout.addView(helloText)
        setContentView(layout)
    }
}RegisterActivity so Android can recognize it:
<!-- android/app/src/main/AndroidManifest.xml -->

<activity android:name=".NativeActivity" android:exported="false" android:theme="@style/AppTheme"/>
To easily toggle between launching your native or React Native screen, define a simple flag inside MainActivity:
// android/app/src/main/java/com/dawidmatyjasikswm/expobrownfield/MainActivity.kt

class MainActivity : ReactActivity() {
  // SWITCH MECHANISM: Comment/uncomment the line below to switch between React Native and Native app
  // Set to true to use Native Activity, false to use React Native
  private val USE_NATIVE_APP = false

  override fun onCreate(savedInstanceState: Bundle?) {
    // Set the theme to AppTheme BEFORE onCreate to support
    // coloring the background, status bar, and navigation bar.
    // This is required for expo-splash-screen.
    setTheme(R.style.AppTheme);

    // SWITCH MECHANISM: Check if we should use native app
    if (USE_NATIVE_APP) {
      // Launch Native Activity instead of React Native
      val intent = Intent(this, NativeActivity::class.java)
      startActivity(intent)
      finish() // Close this activity since we're launching the native one
      return
    }

    super.onCreate(null)
  }
This conditional setup lets you decide which part of the app should open first — it’s a key element in brownfield architecture where native and React Native coexist.
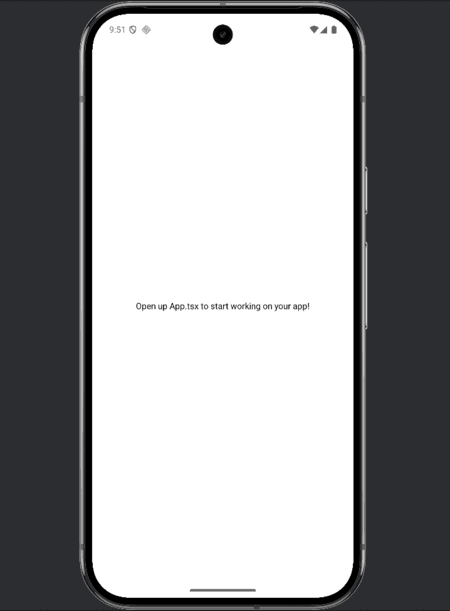
Now it’s time to confirm that everything works correctly. Run the following commands:
npm start
npm run android
You should see your Native Activity displayed as the launch screen:
Try toggling the USE_NATIVE_APP flag — when set to true, the app should open the default native screen instead:
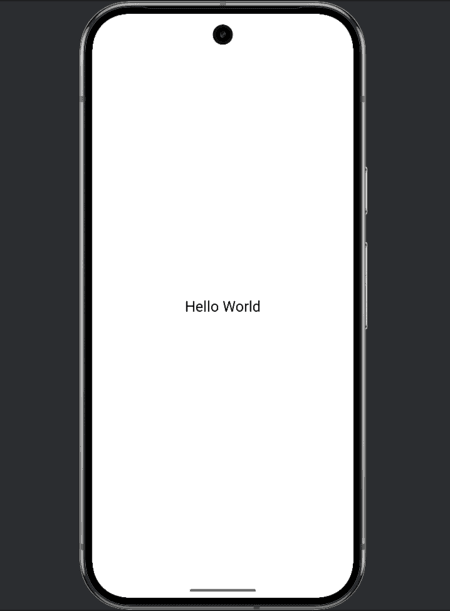
This confirms that both the native and React Native entry points are properly configured and can switch dynamically.
Step 3: Navigating from a native screen to React Native
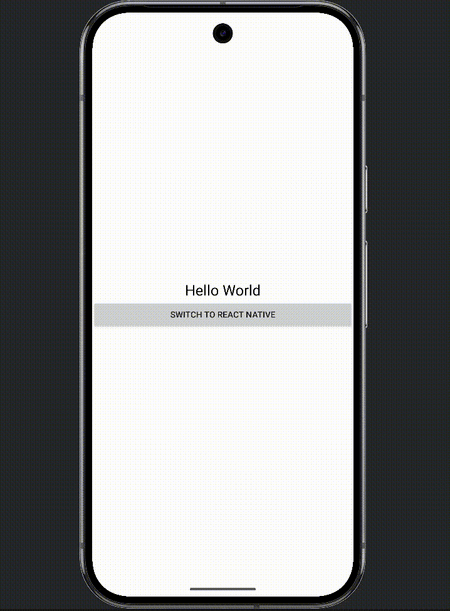
We currently have a working native entry point, the next step is to enable switching from the native part of the app to the React Native part.
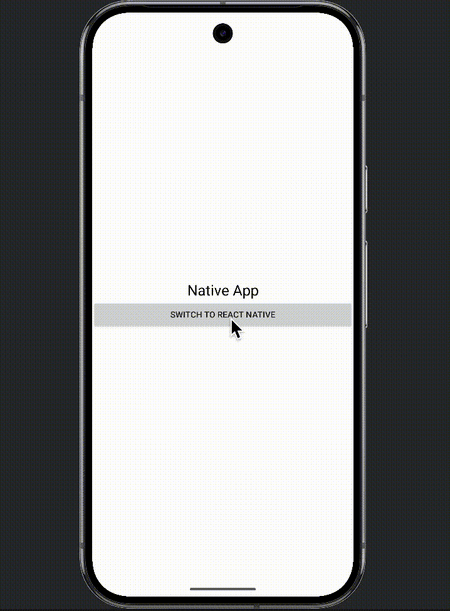
For this purpose, we need to create a simple NativeActivity UI that includes a text label and a button labeled “Switch to React Native”. When the button is clicked, it triggers Intent to launch MainActivity, which hosts the React Native view.
The finish() call ensures the current native screen is closed, resulting in a smooth transition to the React Native part of the app:
// android/app/src/main/java/com/dawidmatyjasikswm/expobrownfield/NativeActivity.kt
package com.dawidmatyjasikswm.expobrownfield

import android.app.Activity
import android.content.Intent
import android.os.Bundle
import android.widget.TextView
import android.widget.Button
import android.widget.LinearLayout
import android.view.Gravity
import android.graphics.Color

class NativeActivity : Activity() {
    override fun onCreate(savedInstanceState: Bundle?) {
        super.onCreate(savedInstanceState)

        val layout = LinearLayout(this).apply {
            orientation = LinearLayout.VERTICAL
            gravity = Gravity.CENTER
            setBackgroundColor(Color.WHITE)
        }

        val helloText = TextView(this).apply {
            text = "Hello World"
            textSize = 24f
            setTextColor(Color.BLACK)
            gravity = Gravity.CENTER
        }

        val switchButton = Button(this).apply {
            text = "Switch to React Native"
            setOnClickListener {
                val intent = Intent(this@NativeActivity, MainActivity::class.java)
                intent.putExtra("SWITCH_TO_REACT", true)
                startActivity(intent)
                finish()
            }
        }

        layout.addView(helloText)
        layout.addView(switchButton)
        setContentView(layout)
    }
}
We need to remove the old USE_NATIVE_APP flag and replace it with a dynamic check for an intent extra (“SWITCH_TO_REACT”).
When MainActivity detects this flag, it automatically starts the NativeActivity:
// android/app/src/main/java/com/dawidmatyjasikswm/expobrownfield/MainActivity.kt

class MainActivity : ReactActivity() {
  override fun onCreate(savedInstanceState: Bundle?) {
    // Set the theme to AppTheme BEFORE onCreate to support
    // coloring the background, status bar, and navigation bar.
    // This is required for expo-splash-screen.
    setTheme(R.style.AppTheme);

    // Check if this is a switch from native activity (has extra flag)
    val switchToReact = intent.getBooleanExtra("SWITCH_TO_REACT", false)

    // SWITCH MECHANISM: Check if we should use native app (and not switching to React)
    if (!switchToReact) {
      // Launch Native Activity instead of React Native
      val intent = Intent(this, NativeActivity::class.java)
      startActivity(intent)
      finish() // Close this activity since we're launching the native one
      return
    }

    super.onCreate(null)
  }
As a result, we now have the option to switch from the native app to React Native. This completes the setup for navigating from a native activity to a React Native activity, which is a fundamental requirement for building a truly integrated brownfield application:
Step 4: Switch from React to native
After enabling transitions from native code to React Native, the next step is to handle the reverse, moving from React Native back to native Activity.
In a brownfield environment, this two-way communication is essential. It allows React Native screens to launch native views when certain actions occur, such as opening a settings screen, displaying a native camera view, or performing platform-specific operations that aren’t handled in JavaScript.
In this step, we’ll implement a mechanism inside the React Native layer to trigger the launch of NativeActivity using the Android Intent system. This will demonstrate how React Native and native components can coexist and interact seamlessly within the same application.
ActivitySwitcherModule.kt defines tiny native module exposed to React Native as “ActivitySwitcher”. It provides a @ReactMethod called switchToNativeActivity() that:
- Grabs the current React Native Activity from
reactApplicationContext.currentActivity. - Creates
IntenttargetingNativeActivity. - Starts that native screen and calls
finish()on the current one for a clean handoff:
// android/app/src/main/java/com/dawidmatyjasikswm/expobrownfield/ActivitySwitcherModule.kt
package com.dawidmatyjasikswm.expobrownfield

import android.content.Intent
import com.facebook.react.bridge.ReactApplicationContext
import com.facebook.react.bridge.ReactContextBaseJavaModule
import com.facebook.react.bridge.ReactMethod

class ActivitySwitcherModule(reactContext: ReactApplicationContext) : ReactContextBaseJavaModule(reactContext) {

    override fun getName(): String {
        return "ActivitySwitcher"
    }

    @ReactMethod
    fun switchToNativeActivity() {
        val activity = reactApplicationContext.currentActivity
        activity?.let {
            val intent = Intent(it, NativeActivity::class.java)
            it.startActivity(intent)
            it.finish()
        }
    }
}
Here we register the previously created ActivitySwitcherModule so React Native can access.
This registration step ensures the module is recognized by the React Native bridge, allowing JavaScript to call switchToNativeActivity() seamlessly.
// android/app/src/main/java/com/dawidmatyjasikswm/expobrownfield/ActivitySwitcherPackage.kt
package com.dawidmatyjasikswm.expobrownfield

import com.facebook.react.ReactPackage
import com.facebook.react.bridge.NativeModule
import com.facebook.react.bridge.ReactApplicationContext
import com.facebook.react.uimanager.ViewManager

class ActivitySwitcherPackage : ReactPackage {
    override fun createNativeModules(reactContext: ReactApplicationContext): List<NativeModule> {
        return listOf(ActivitySwitcherModule(reactContext))
    }

    override fun createViewManagers(reactContext: ReactApplicationContext): List<ViewManager<*, *>> {
        return emptyList()
    }
}
In the React Native App.tsx, we import NativeModules and access our native module as ActivitySwitcher.
When the user taps the Switch to Native Activity button, the native module is triggered, launching Android NativeActivity and closing the React Native screen:
// App.tsx
import { StyleSheet, Text, View, NativeModules, Button } from "react-native";

const { ActivitySwitcher } = NativeModules;

export default function App() {
  const switchToNative = () => {
    try {
      ActivitySwitcher.switchToNativeActivity();
    } catch (error) {
      console.error("Error switching to native:", error);
    }
  };

  return (
    <View style={styles.container}>
      <Text style={styles.title}>React Native App</Text>

      <Button title="Switch to Native Activity" onPress={switchToNative} />
    </View>
  );
}

const styles = StyleSheet.create({
  container: {
    flex: 1,
    backgroundColor: "#fff",
    alignItems: "center",
    justifyContent: "center",
    padding: 20,
  },
  title: {
    fontSize: 24,
    marginBottom: 10,
  },
});
We register our custom ActivitySwitcherPackage() inside the PackageList(…) — this makes the ActivitySwitcher native module available to JavaScript, enabling NativeModules.ActivitySwitcher.switchToNativeActivity() to work.
// android/app/src/main/java/com/dawidmatyjasikswm/expobrownfield/MainApplication.kt
override fun getPackages(): List<ReactPackage> =
PackageList(this).packages.apply {
// Packages that cannot be autolinked yet can be added manually here, for example:
// add(MyReactNativePackage())
add(ActivitySwitcherPackage())
}
}
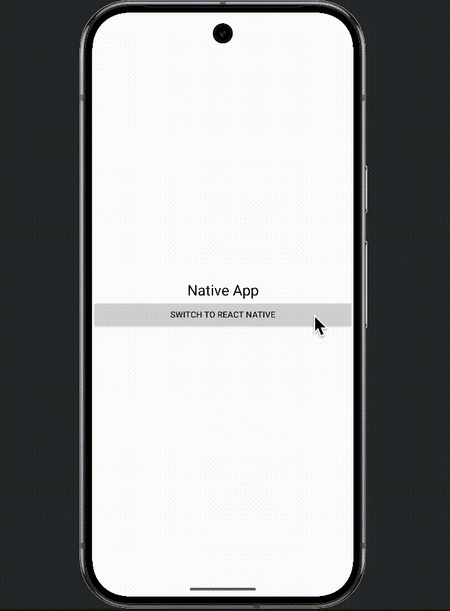
)Finally, we’re changing the label text from Hello World to Native App, so it’s obvious we’ve switched out of React Native during the demo:
// android/app/src/main/java/com/dawidmatyjasikswm/expobrownfield/NativeActivity.kt
package com.dawidmatyjasikswm.expobrownfield

import android.app.Activity
import android.content.Intent
import android.os.Bundle
import android.widget.TextView
import android.widget.Button
import android.widget.LinearLayout
import android.view.Gravity
import android.graphics.Color

class NativeActivity : Activity() {
    override fun onCreate(savedInstanceState: Bundle?) {
        super.onCreate(savedInstanceState)

        val layout = LinearLayout(this).apply {
            orientation = LinearLayout.VERTICAL
            gravity = Gravity.CENTER
            setBackgroundColor(Color.WHITE)
        }

        val helloText = TextView(this).apply {
            text = "Native App"
            textSize = 24f
            setTextColor(Color.BLACK)
            gravity = Gravity.CENTER
        }

        val switchButton = Button(this).apply {
            text = "Switch to React Native"
            setOnClickListener {
                val intent = Intent(this@NativeActivity, MainActivity::class.java)
                intent.putExtra("SWITCH_TO_REACT", true)
                startActivity(intent)
                finish()
            }
        }

        layout.addView(helloText)
        layout.addView(switchButton)
        setContentView(layout)
    }
}
The video below demonstrates the seamless transition between the native and React Native parts of the application.
Starting from NativeActivity, we navigate into the React Native screen, and then return back to the native interface, all within the same app session.
This confirms that both environments are fully integrated and can communicate bi-directionally. The user experience remains smooth, with no noticeable delays or reloads, showcasing the flexibility of the brownfield setup.
Configuring EAS and local builds
Now that we have a fully working demo showing seamless transitions between native and React Native Activities, it’s time to package everything into the Android build.
To do this, we’ll use EAS Build (Expo Application Services), which allows us to compile the project locally or in the cloud with a single command.
We start by running:
npx eas build:configureThis command initializes the EAS configuration and prompts you to choose which platforms to support. In our case, we select Android, since we’re building .apk to test the integration locally.

Next, we can build the app directly on our machine using the following command:
npx eas build --profile preview --platform android –localThis triggers a local EAS build, which compiles the entire project using Gradle and outputs the .apk file ready to install on a physical device or emulator.
After installation, you can open the app and see everything working as before, starting from NativeActivity, switching to React Native, and returning back to native:
Limitations of brownfield integration
One important limitation of the current setup is that you can’t use commands like npx expo prebuild --clean or Continuous Native Generation (CNG).
Both of these processes automatically regenerate the native project structure, which means they‘ll overwrite all manually modified native files, including our custom Activities and modules.
At the moment, there’s no stable workaround for this issue. Any custom native code must be re-applied manually after running these commands. In the future, this limitation might be resolved with Expo patch-project, an experimental tool that allows you to define and reapply changes made to the native project automatically.
Essentially, it works like a version-controlled patch system, recording diffs between the generated files and your custom modifications. Then, whenever you rebuild or update the native project, patch-project can automatically reapply those changes, preventing you from losing your custom Kotlin, Swift, or configuration edits.
For now, though, it’s best to avoid running prebuild cleanups or CNG on projects containing manual native integrations.
Conclusion
Integrating React Native into an existing native app is a great way to modernize established mobile projects without rebuilding them from the ground up.
With the integrated brownfield architecture, Expo provides a clean and maintainable workflow where both native and React Native layers live side by side. In this guide, we’ve built a small demo that transitions smoothly between native and React Native Activities, proving that the two worlds can coexist inside one project without extra complexity.
This setup gives teams a gradual adoption path — starting with a single feature, validating the approach, and then expanding React Native’s footprint as confidence grows. It’s a flexible model that keeps production stability intact while introducing modern DX improvements and faster iteration cycles.
There are still limitations, especially around commands like Expo prebuild --clean and Continuous Native Generation (CNG), which can overwrite manual changes. For now, custom native edits must be restored manually. However, upcoming tools like Expo patch-project are already showing promise for automating this process and making hybrid workflows more robust.
You can explore the full working example on GitHub:
👉 https://github.com/dawidmatyjasik/expo-brownfield
Check out the commit history to follow each step of the integration process, from creating the native Activity, through intent-based navigation, to building the final APK.
The integrated approach is about more than bridging two technologies, it’s about creating a unified development environment that combines the stability of native with the flexibility of React Native. It’s the balance between legacy and innovation, and a glimpse into how mobile apps will increasingly evolve in the future. :)
If you need help with your brownfield project, you can always reach out to us at [email protected]. As React Native core contributors and top contributing group to the Expo ecosystem, we’re more than ready to help you!
We’re Software Mansion: multimedia experts, AI explorers, React Native core contributors, community builders, and software development consultants.